


NOTE: DIAGRAMS & ILLUSTRATIONS ARE NOT TO SCALE.
27
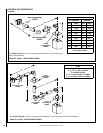
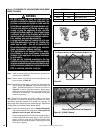
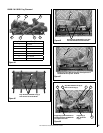
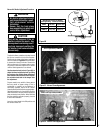
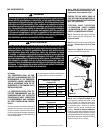
Figure 52 - Burner Flame Appearance
(Rustic Oak Logs Shown) LSM45-2
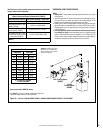
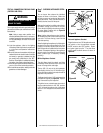
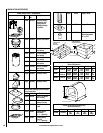
Figure 51 - Burner Flame Appearance
(Birch Logs Shown) LSM40-2
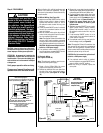
To adjust the flame, rotate the air shutter toward
the back or toward the front of the fireplace.
Position the air shutter to the factory setting as
shown in the table in
Figure 50. Allow the burner
to operate for at least 15 minutes. Observe the
flame continuously. If it appears weak or sooty
as previously described, adjust the air shutter
until the flame appearance is as desired.
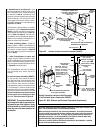
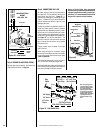
Use the extension knob (refer to Figure 38), to
adjust the flame height as desired, by sliding
the knob over the variable flame adjustment
knob located on the front of the valve. Replace
the extension knob back to the hanger after
the adjustment.
Propane models may exhibit a flame pattern
that may candle or appear stringy. If this is
problematic or persists as the appliance is
continually operated, adjust the air shutter
closed as described in the previous paragraphs.
Operate the appliance for a period of time as the
effect diminishes, ensuring that the appliance
does not develop sooty flames. When satisfied
that the appliance operates properly, proceed
to finish the installation.
Leave the control knob in the ON position and
the remote switch OFF.
CAUTION
Soot will be produced if the air
shutter is closed too much. Any
damage due to carboning result-
ing from improperly setting the
air shutter is not covered under
the warranty.
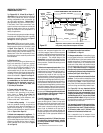
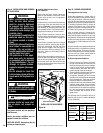
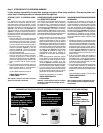
Air Shutter
Opening
Burner
Orifice
Gas
Valve
Venturi
Venturi
Main Burner Factory Air Shutter
Opening Setting - Inches (millimeter)
Model Nat.Gas Propane Gas
LSM40-2
1/16 (1.59) 9/32 (7.14)
LSM45-2
1/16 (1.59) 9/32 (7.14)
Figure 50
WARNING
• Air shutter adjustment should
only be performed by a quali-
fied professional service
technician.
• Ensure that the front glass
door assembly is in place and
sealed After adjustment.
Burner Air Shutter Adjustment Procedure