


60
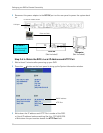
Setting up your DVR for Remote Connectivity
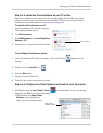
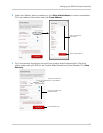
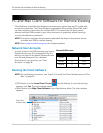
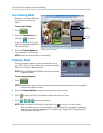
5 Configure the following:
• DDNS User Name: Enter
the DDNS User Name from the confirmation email that was sent to
you after you created your DDNS account.
• DDNS Password: Ent
er the DDNS Device Password from the confirmation email.
• DDNS Domain Name: Ent
er the Domain name/URL Request from the confirmation email.
6 Click A
pply to save your changes.
7 Reset the DVR by disconnecting and reconnecting the power cable from the rear panel.
NOTE: Please allow 10~15 minutes for the DDNS servers to update with your new DDNS
addr
ess before attempting to connect.
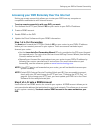
Step 4 of 4: Update the Client Software with your DDNS Information
Finally, you must configure your DVR List with the DDNS information for your DVR by
adding a new DVR entry to the DVR List with your DDNS address. You will use the DDNS
address whenever you want to connect to your DVR over the Internet.
If you are performing the steps below on a computer on the same ne
twork as your DVR,
this allows you to keep a separate entry for your DVR on the local network. Connecting to
the DVR will be faster on the local network and will allow you to save bandwidth.
To add a new entry to your DVR list us
ing the DDNS address:
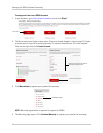
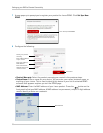
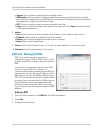
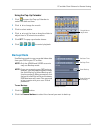
1 Open the Client Softwar
e and click DVR List. The DVR List window opens.
2 Click Ad
d.
3 Configure the following:
• Name: Ente
r the name you would like to use for your DVR. You can use your name, your
company or business name, or anything of your choice.
• IP/DDNS: Enter the Do
main name/URL Request followed by .lorexddns.net. For example, if
the Domain name/URL request is
tomsmith
, enter
tomsmith.lorexddns.net
.
• Port: Ent
er the HTTP port (default: 80) from the System Information window.
• ID: Enter the ADMIN ID f
or remote viewing (default: 9).
• Password: En
ter the ADMIN password for remote viewing (default: 3333).
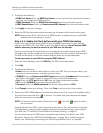
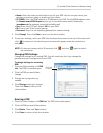
4 Click Change t
o save your settings. Then click Close to return to the client window.
5 Select your DVR’s DDNS address from the drop-down menu (e.g.
tomsmith.lorexddns.net
) at
the top of the screen and click
to connect. Live video from your cameras will appear
when the connection is successful.
NOTE: If it does
not
connect within 30 seconds, click and click again to refresh
the connection.
Congratulations! Your DVR is now connected to the Internet. For instructions on us
ing the
Client Software to view live video, playback and backup recorded footage, and configure
your DVR, see “PC and Mac Client Software for Remote Viewing” on page 62.
You can now access your DVR using a compatible web browser (for details, se
e “DVR
Netviewer: Viewing Your DVR Using a Web Browser” on page 76) or mobile device (for
details, see “Mobile Apps: Accessing your DVR Using a Mobile Device” on page 85).