


21Heatilator • ECO-WINS18 • 7065-132B • August 29 2011
5
Service Parts Replacement
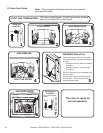
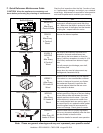
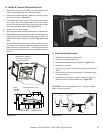
A. Glass Replacement
(Replace with 5mm ceramic glass only)
1. Ensurethatthereisoutandtheapplianceiscoolto
thetouch.
2. Protectatableorcountertopwithpaddingortowels.
Protectyourhandsandwearglovestopreventinjury.
3. Removethedoorwiththebrokenglassbyliftingthe
doorupandoffofthehinges.
4.
Laydoorfacedownonatableorcountermakingsure
thehandlehangsovertheedgesothedoorlaysat,on
asoftsurface.
5. Removethescrewsfromeachglassretainerandremove
theglass.(Ifscrewsaredifculttoremove,soakwith
penetratingoilrst).
6. Centertheglasswith edgesevenlyoverlappingthe
openinginthedoor,(i.e.samespacetopandbottom,
leftandrightsides).
7. Replacetheglassretainers.Becarefulnottocross
threadthescrews.
8. Tighten each retainerjust afew turnsuntileachis
secured.Checkagainforcenteringofglassindoor
frame.Continuetotighteneachretaineralternately,a
fewturnsatatime,untiltheglassissecure.DONOT
OVERTIGHTEN-cancauseglasstobreak.
9. Replacethedoorontheappliance.
Heatilatorappliancesareequippedwithceramicsuperheat-
resistantglass,whichcanonlybebrokenbyimpactormisuse.
WARNING! Risk of Fire or Injury!
Useonlyglassthatisspeciedinthemanual,DONOT
replacewithanyothermaterial.Glassbreakagewilloccur.
CAUTION!
Handleglasswithcare.
• Inspectthegaskettoensureitisundamaged.
• DoNOTstrike,slamorscratchglass.
• DoNOToperateappliancewithglass&doorassembly
removed.
• DoNOToperatewithglasscracked,brokenor
scratched.
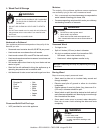
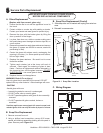
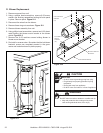
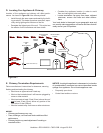
B. Snap Disc Replacement (Cont;d)
Figure 21.1 Snap Disc Location
1. Removesurroundfromunit.
2. Using a phillips head screwdriver, remove 8-32 screw,
washerandbushingassembliesholdingleftsidepanelin
place.Removepanel.Figure 21.1
UNPLUG APPLIANCE FROM ANY POWER SOURCE
BEFORE REPLACING ANY COMPONENTS
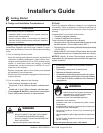
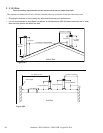
White
Black
White
Black
Black
White
Blower
Snap Disc
Rheostat
Switch
Power Cord
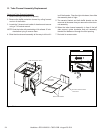
B. Snap Disc Replacement
3.Slidesnapdiscoutofbracketandunplugfromwirehar-
ness.
4. Reinstallinreverseorder.
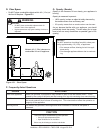
C. Wiring Diagram
Figure 21.2
SNAP DISC
LEFT SIDE
PANEL
ATTACHMENT
HARDWARE