


51
Heat & Glo • 550TRSI-AUF, 550TRSILP-AUF • 2079-980 Rev. N • 5/12
CAULK
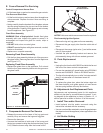
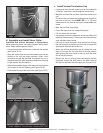
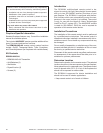
K. Assemble and Install Storm Collar
CAUTION!RiskofCuts,AbrasionsorFlyingDebris.
Wear protective gloves and safety glasses during instal-
lation. Sheet metal edges are sharp.
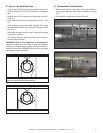
• Connect both halves of the storm collar with two screws
(see Figure 10.21).
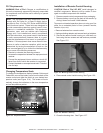
• Wrap the storm collar around the exposed pipe section
closest to the roof and align brackets. Insert a bolt
(provided) through the brackets and tighten the nut to
complete the storm collar assembly. Make sure the collar
is tight against the pipe section.
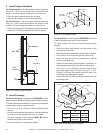
• Slide the assembled storm collar down the pipe section
until it rests on the roof ashing (see Figure 10.22).
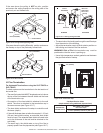
• Caulk around the top of the storm collar (see Figure 10.23).
Figure 10.21 Assembling the Storm Collar
Figure 10.22 Assembling the Storm Collar Around the Pipe
Figure 10.20
SCREWS
CAULK
STORM
COLLAR
(1 of 3)
Figure 10.23
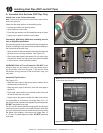
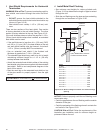
TERMINATION CAP
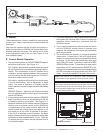
L. Install Vertical Termination Cap
• Locate and mark the ue center point on the underside
of the roof, and drive a nail through the center point.
• Make the outline of the roof hole around the center point
nail.
• The size of the roof hole framing dimensions depend on
the pitch of the roof. There MUST BE a 1 in. (25 mm)
clearance from the vertical ue pipe to combustible ma-
terials.
• Mark the roof hole accordingly.
• Cover the opening of the installed ue pipes.
• Cut and frame the roof hole.
• Use framing lumber the same size as the roof rafters and
install the frame securely. Flashing anchored to the frame
must withstand heavy winds.
• Continue to install concentric ue sections up through
the roof hole and up past the roof line until you reach the
appropriate distance above the roof.
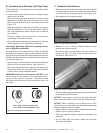
• Attach the vertical termination cap by sliding the inner
collar of the cap into the inner ue of the pipe section
while placing the outer collar of the cap over the outer
ue of the pipe section.
• Secure the cap by driving three self-tapping screws
(supplied) through the pilot holes in the outer collar of
the cap into the outer ue of the pipe (see Figure 10.23).
BRACKETS