


45
Heat & Glo • 550TRSI-AUF, 550TRSILP-AUF • 2079-980 Rev. N • 5/12
10
Installing Vent Pipe (DVP and SLP Pipe)
A. Assemble Vent Sections (DVP Pipe Only)
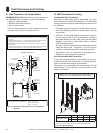
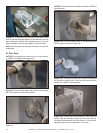
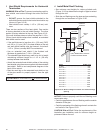
Attach Vent to the Firebox Assembly
Note: The end of the pipe sections with the lanced tabs will face
toward the appliance.
Attach the rst pipe section to the starting collar:
• Lanced pipe end to the starting collar
• Inner pipe over inner collar
• Push the pipe section until all lanced tabs snap in place
• Lightly tug on pipe to conrm it has locked.
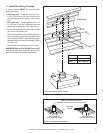
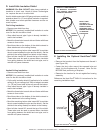
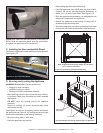
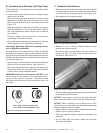
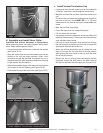
Figure 10.1 High Temperature Silicone Sealant
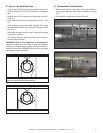
Figure 10.2
A
B
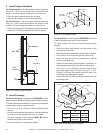
Figure 10.3
Assemble Pipe Sections
Per Figure 10.2:
• Start the inner pipe on the lanced end of section A into
the ared end of section B.
• Start the outer pipe of section A over the outer pipe of
section B.
• Once both vents sections are started, push rmly until
all lanced tabs lock into place.
• Lightly tug on the pipe to conrm the tabs have locked.
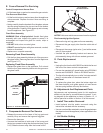
It is acceptable to use screws no longer than 1/2 in. (13
mm) to hold outer pipe sections together. If predrilling holes,
DO NOT penetrate inner pipe.
For 90° and 45° elbows that are changing the vent direction
from horizontal to vertical, one screw minimum should be
put in the outer ue at the horizontal elbow joint to prevent
the elbow from rotating. Use screws no longer than 1/2
in. (13 mm). If predrilling screw holes, DO NOT penetrate
inner pipe.
Commercial, Multi-family (Multi-level exceeding two sto-
ries), or High-Rise Applications
All outer pipe joints must be sealed with high temperature
silicone, including the slip section that connects directly to
the horizontal termination cap.
• Apply a bead of silicone sealant inside the female outer
pipe joint prior to joining sections. See Figure 10.1
• Only outer pipes need to be sealed. All unit collar, pipe,
slip section, elbow and cap outer ues shall be sealed
in this manner, unless otherwise stated.
WARNING!RiskofFireorExplosion!DONOT break
silicone seals on slip sections. Use care when remov-
ing termination cap from slip pipe. If slip section seals
are broken during removal of the termination cap, vent
may leak.
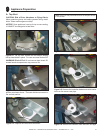
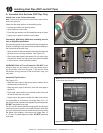
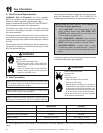
Figure 10.4 Seams
Note: Make sure that the seams are not aligned to prevent
unintentional disconnection.
INCORRECT
CORRECT
Lances