


For Help,call 1-800-35-GENIE or visit www.geniecompany.com
7
CHECK POWER HEAD
MOUNTING AREA
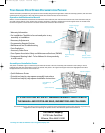
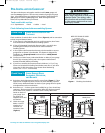
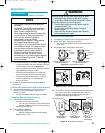
Check ceiling or space above where Opener Power Head will be
mounted (Figure 5):
A Measure from garage door center line mark toward rear
of garage:
• Approximately 10' back if garage has a 7' 6" door.
• Approximately 11' back if garage has an 8' 0" door.
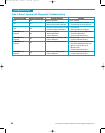
B Find location of ceiling joist or truss above where Opener
Power Head will be and estimate type and quantity of
materials needed for your installation (Figure 6).
Check Step 5:
NOTE
Since garage construction varies widely, there may be
hardware required in addition to the mounting straps.
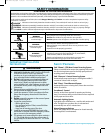
CHECK CEILING FOR GROUNDED
POWER SOURCE
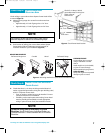
A Check that there is a 15 Amp 120 Volt grounded electrical
outlet or grounded permanent wiring box (per building code)
within 3' of Opener Power Head:
• If not,an outlet or wiring box must be installed. Contact
a licensed electrician for installation.
• If building codes require permanent wiring,Power Head
must be partially disassembled to install appropriate
wiring in place of Power Cord (See Installation Poster).
Check Step 6:
NOTE
Permanent wiring must be installed by a Licensed
Electrician
. Not all Genie Factory Authorized Dealers are
Licensed Electrician's. Contact someone who is a Licensed
Electrician.
Check for 15 Amp, 120 Volt
grounded outlet or wiring box
within 3 feet of
Power Head.
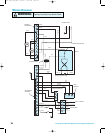
Figure 5 Check Power Head location
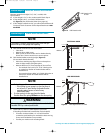
Conduit
Perforated Angle Iron
Figure 6
Mounting methods for open beam or finished ceilings
FINISHED CEILINGS
Locate ceiling joists or trusses
using a stud finder or similar
device.
Attach angle iron (not included)
to joists or trusses through
finish material using Lag Screws.
OPEN CEILINGS
Straps and angle iron may attach
directly to joists or trusses.
MOUNTING EXAMPLES
55 11
30
30
55 11
30
Perforated Straps
10'
for 7-1/2' doors
11'
for 8' doors
Wood
2060-3060 eng.qxd 11/9/05 11:02 AM Page 7