


10
For Help,call 1-800-35-GENIE or visit www.geniecompany.com
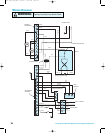
Setting Force Controls and Final Adjustment of
Limit Switches (continued)
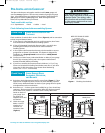
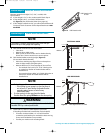
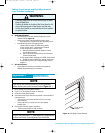
B OPEN ADJUSTMENT
• On front panel of Power Head find adjusting screw
marked “OPEN” (
Figure 9).
• Gently turn screw counterclockwise until it stops.
– Very little force is required to turn adjusting screw.
• Press Wall Console to close garage door.
– Observe if door stops at “OPEN”limit switch.
If door is fully open—adjustment is finished.
– If door stops but is not fully open,
a. Measure distance between bottom of door
top of door opening.
b. Move “OPEN”Limit Switch that same distance
toward Power Head.
– If door stops before reaching the “OPEN”Limit Switch
a.
Slightly increase OPEN Force setting (clockwise).
– If door fails to move,see Troubleshooting Section,
pages 15.
C Run Door Opener
• Cycle opener a few times to double check settings.
Repeat adjustment steps as necessary.
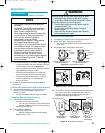
WARNING
• A moving grage door can cause serious injury or death.
• Keep the path clear.
• Position the ladder to the side of the Power Head so it is
clear of all moving parts of the Opener and the door.
• Set the door Opener to use the minimum force needed
to open the door.
A Open garage door using Wall Console.
B Lay a 2" x 4" board flat in center of doorway.
C Close door using Wall Console.
D Check that door stops and reverses within 2 seconds after it
contacts board:
•
If door does not reverse,decrease Close Force until
door reverses.
•
If door still does not reverse,move Limit Switch
toward door.
E Check Safe-T-Beam® System operation:
•
If beam is blocked,door will not close.
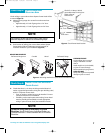
NOTE
The door must contact the 2" x 4" board before the Carriage activates
the Close Limit Switch. If not,readjust the Close Limit Switch.
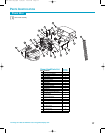
CH
SETTING CONTACT
REVERSE FUNCTION
Adjustment 2:
NOTE
Limit Switch and Force Adjustments must be completed
before checking the contact reverse function (
Figure 10 ).
2" x 4" board
laid flat
Figure 10 Checking Contact Reverse
2060-3060 eng.qxd 11/9/05 11:02 AM Page 10