


27
Initial Installation
QUALIFIED INSTALLERS ONLY
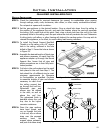
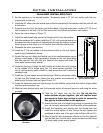
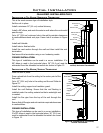
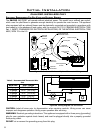
INSTALLATION OF TOP VENTED; HORIZONTAL TERMINATION:
Siding
Exterior wall
Drywall
Vent pipe
Inside
finished collar
Wall thimble
Termination
Figure 37: Installation for Top
Vented; Horizontal Termination.
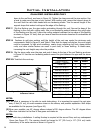
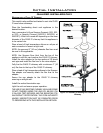
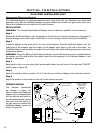
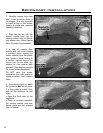
INSTALLATION OF TOP VENTED; VERTICAL TERMINATION:
Vent cap
Roof flashing
Roof
truss
Flue pipe
Insulation
gaurd
Ceiling
support
Inside
finished collar
Figure 38: Installation for Top Vented;
Vertical Termination.
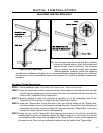
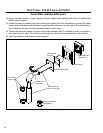
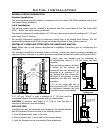
This is the most common type of installation style.
Set the unit in place.
Install a minimum 24” (61 cm) vertical chimney.
Install a 90° elbow, and mark the exterior wall where the vent would
pass through.
Cut a 10” (25.4 cm) minimum hole in the wall to maintain clearances
to combustibles around vent pipe. Frame hole if as shown in Figure
17.
Install wall thimble.
Install interior nished collar
Install the vent section through the wall and then install the vent
termination.
Seal around the termination using a non hardening mastic.
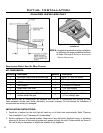
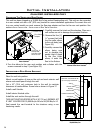
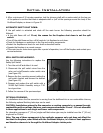
CORNER INSTALLATION:
This type of installation can be used in a corner installation. If a
90° elbow is used in the horizontal plane, 36” (91.4 cm) must be
subtracted from the allowable horizontal run shown in Figure 12.
Place the unit in place.
Drop a plumb bob from the ceiling to the center point of the
ue outlet.
Cut a 10” (25.4 cm) hole in the ceiling and the roof. Refer to
Figure 23.
Install the ceiling support and insulation guard.
Install the roof ashing. Ensure that the roof ashing is
installed under the roong material so that a watertight seal
is created.
Install the ue pipe from the top of the unit through the
roof.
Ensure that all ue pipe and unit maintain required clearances
to combustibles.
CORNER INSTALLATION:
This type of installation can be used in a corner installation.
If a 90° elbow is used in the horizontal plane, 36” (91.4 cm)
must be subtracted from the allowable horizontal run shown
in Figure 12.