


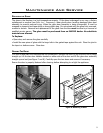
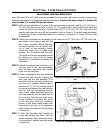

Step 8. Install the new pilot injector supplied with this conversion kit. Simply screw the new injector
inside the pilot hood and reinstall the hood by placing the hood on the assembly, line up the
key way, and snap into place.
Step 9. Remove the main burner orice with a inch deep socket.
Step 10. Install the new orice supplied. Be sure to put a bead of pipe-thread sealant or approved Teon
tape on the orice before installing into the burner assembly.
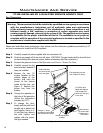
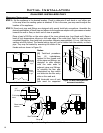
Step 11. Re-install burner tray, log set and door. Pay special attention when installing the burner that
the venturi adjustment rod is properly installed into the venturi adjustment piece welded to the
burner venturi tube. Also refer to SECONDARY INSTALLATION - INSTALLING LOG SET AND EMBERS.
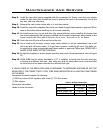
Step 12. Open the shut-off valve at the gas line to the unit.
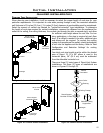
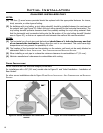
Step 13. Use a small brush to apply a warm soapy water solution to all gas connections (use a half
dish soap and half warm water). If a gas leak is present, bubbling will occur. Gas leaks can
be repaired by using an approved pipe thread sealant or approved Teon tape. NEVER USE A
NAKED FLAME WHEN TESTING FOR LEAKS.
Step 14. Re-light the replace to ensure proper operation and proper ame appearance, refer to Figure
55.
Step 15. MAKE SURE that the sticker provided by S.I.T. is installed, to signify that the valve has been
converted to a different fuel type. Also, make sure that the rating plate has a conversion label
to show this unit has been converted to a different fuel type.
A VISUAL CHECK OF THE REGULATOR KNOB IS NECESSARY TO DETERMINE WHETHER OR NOT THE
REGULATOR IS THE CORRECT PART. A 50% TURN DOWN REGULATOR WILL HAVE ONLY ONE CORNER
ON THE KNOB
Conversion Kit should contain the following:
(1) 50% turn down HI/LO regulator with three (3) T-20 Torx screws
(1) Pilot injector
Conversion instructions
Labels to show conversion
11
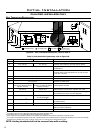
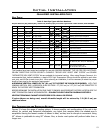
Table 1: Orice Information.
Natural Gas Propane
Pilot Orice .62 mm .35 mm
Burner Orice Top #39 DMS #53 DMS
Venturi Setting
1
/16” min.
3
/16” min.
Maintenance And Service