


www.desatech.com
111245-01B 17
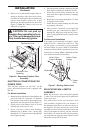
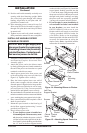
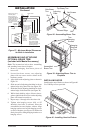
16. Reattach fireplace floor assembly with
screws removed in step 3 of Removing Fire
-
place Screen and Floor Assembly, page 9.
Note: Discard the remaining hardware items.
After assembly, make sure all wires are com
-
pletely clear of blower wheel.
17. Install logs (see Installing Logs, page 24)
and fireplace screen (see Installing Screen,
page 25).
WARNING: Failure to position
the parts in accordance with sup
-
plied diagrams or failure to use
only parts specifically approved
with this heater may result in
damage or personal injury.
WARNING: A qualified
service person must connect
fireplace to gas supply. Follow
all local codes.
If any of the original wire as supplied with the
appliance must be replaced, it must be replaced
with 105˚C wire or it's equivalent.
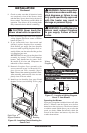
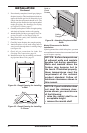
Operating the Blower
After final installation of your fireplace, light your
gas appliance with the blower off. After about 15
minutes, turn the blower on to deliver heated air
at the top louvers. The blower features a variable
control which allows you to select the speed you
desire. In the OFF position, the blower will not
operate. In the ON position, the blower will start
when the thermostat senses a sufficient increase
in firebox temperature (approximately 10 to 20
minutes depending on heat setting).
Your gas logs and thermostat blower will not turn
on and off at the same time. The fireplace may run
for several minutes before the blower turns on.
After the heater modulates to the pilot position, the
blower will continue to run. The blower will shut
off after the firebox temperature decreases.
It is safe to operate fireplace with blower turned
off. However, the blower helps distribute heated
air from the fireplace.
Note: Periodically check the louvers of the firebox
and remove any dust, dirt or other obstructions.
INSTALLATION
Continued
INSTALLING GAS PIPING TO
FIREPLACE LOCATION
WARNING: A qualified
service person must connect
fireplace to gas supply. Follow
all local codes.
WARNING: For propane/LP
units, never connect fireplace
directly to propane/LP supply.
This fireplace requires an external
regulator (not supplied). Install the
external regulator between the
heater and propane/LP supply.
WARNING: For natural gas
units, never connect fireplace
to private (non-utility) gas wells.
This gas is commonly known as
wellhead gas.
Installation Items Needed
Before installing fireplace, make sure you have
the items listed below.
• external regulator (supplied by installer, for
propane/LP units only)
• piping (check local codes)
• sealant (resistant to propane/LP gas)
• equipment shutoff valve *
• test gauge connection *
• sediment trap
• tee joint
• pipe wrench
• approved flexible gas line with gas connector
(if allowed by local codes) (not provided)
* A CSA design-certified equipment shutoff valve
with 1/8" NPT tap is an acceptable alternative to
test gauge connection. Purchase the optional CSA
design-certified equipment shutoff valve from your
dealer. See
Accessories, page 40.
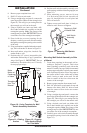
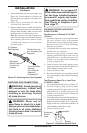
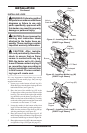
For propane/LP units, the installer must supply
an external regulator. The external regulator will
reduce incoming gas pressure. You must reduce
incoming gas pressure to between 11 and 14 inches
of water. If you do not reduce incoming gas pres
-
sure, heater regulator damage could occur. Install
external regulator with the vent pointing down as
shown in Figure 24, page 18. Pointing the vent
down protects it from freezing rain or sleet.