


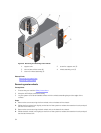

Installing the optical drive or tape drive
Prerequisites
CAUTION: Many repairs may only be done by a certified service technician. You should only
perform troubleshooting and simple repairs as authorized in your product documentation, or as
directed by the online or telephone service and support team. Damage due to servicing that is
not authorized by Dell is not covered by your warranty. Read and follow the safety instructions
that came with the product.
1. Ensure that you read the Safety instructions.
2. Follow the procedure listed in Before working inside your system.
Steps
1. Unpack and prepare the drive for installation.
For instructions, see the documentation that accompanied the drive.
If you are installing a SAS tape drive, you must have an internal tape adapter installed. For more
information on installing a SAS tape drive, see Installing an expansion card.
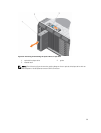
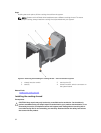
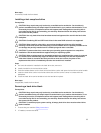
2. If installed, remove the old drive or the drive blank.
3. Align the guide on the drive with the slot on drive bay.
4. Slide the optical/tape drive into the slot until the optical/tape drive snaps into place.
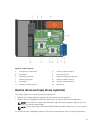
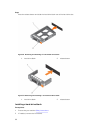
5. Connect the power cable and data cables to the back of the optical/tape drive.
6. Connect the power cable to the backplane and the and data cable to the system board.
You can connect up to one optical drive with one SATA tape backup unit, and one SAS tape backup
unit using Dell OpenManage IT Assistant.
Next steps
Follow the procedure listed in After working inside your system.
Related Links
Removing the optical drive or tape drive
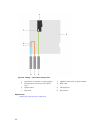
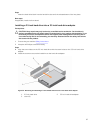
Cooling shroud
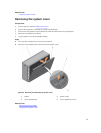
Removing the cooling shroud
Prerequisites
CAUTION: Many repairs may only be done by a certified service technician. You should only
perform troubleshooting and simple repairs as authorized in your product documentation, or as
directed by the online or telephone service and support team. Damage due to servicing that is
not authorized by Dell is not covered by your warranty. Read and follow the safety instructions
that came with the product.
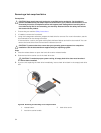
CAUTION: Never operate your system with the cooling shroud removed. The system may get
overheated quickly, resulting in shutdown of the system and loss of data.
1. Ensure that you read the Safety instructions.
2. Follow the procedure listed in Before working inside your system.
61