


40
X Service and Maintenance
The following routine maintenance should be performed on an annual basis:
1) Turn off power to the boiler.
2) Inspect the flue passages for signs of blockage. If there is any carbon in the combustion chamber or the flue passages,
clean the heat exchanger before proceeding further. See the cleaning procedure below.
3) Remove any debris found in the combustion chamber, being careful not to disturb combustion chamber insulation.
4) Remove all burners, noting the location of the pilot main burner. If burners show signs of deterioration, they should be
replaced (some discoloration around the burner ports is normal). Clean the burners by first brushing the ports with a soft
bristle brush and then vacuuming out any debris through the venturi opening.
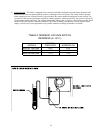
5) Inspect the pilot assembly. Clean any deposits found on the electrode and grounding strap. The ideal gap between the
electrode and the ground strap is 1/8”. Inspect the porcelain for cracks or other deterioration. Replace pilot assembly if
deterioration is found.
6) Inspect the combustion chamber insulation for deterioration.
7) Inspect the ignition cable insulation for cracks or other deterioration. If deterioration is found, replace cable.
8) Reinstall burners, being careful to put the pilot main burner in its original location.
9) Inspect all boiler wiring for loose connections or deterioration.
CAUTION
LABEL ALL WIRES PRIOR TO DISCONNECTION WHEN SERVICING CONTROLS. WIRING ERRORS CAN CAUSE
IMPROPER AND DANGEROUS OPERATION. VERIFY PROPER OPERATION AFTER SERVICING.
10) Inspect the vacuum switch hose for deterioration. Clean out any condensate or other blockage found in this tube.
11) Disconnect the vent system from the boiler using the four 10-32 screws in the vent collar. Inspect the blower wheel and
fan housing for corrosion damage. If damage is found, replace the fan assembly.
12) Inspect the vent system:
a) Make sure that the vent terminal is free of obstructions.
b) Make sure that all vent system supports are intact.
c) Inspect joints for signs of condensate or flue gas leakage.
d) If the vent system contains a condensate trap, make sure that the trap is in good condition and clear of blockages.
e) If this boiler is equipped with the optional Category I Vent Kit, refer to the vent kit instructions for additional
maintenance information.
13) Inspect the boiler and hydronic system for leaks.
CAUTION
WATER LEAKS CAN CAUSE SEVERE CORROSION DAMAGE TO THE BOILER OR OTHER SYSTEM
COMPONENTS. REPAIR ANY LEAKS FOUND IMMEDIATELY.
14) Place the boiler back in operation using the procedure outlined in “Start-up”. Check the pilot line and any other gas piping
disturbed during the inspection process for leaks.
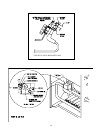
Heat Exchanger Cleaning Procedure
1) Turn off power to the boiler.
2) Disconnect the vent system from the boiler by removing the four 10-32 screws holding the vent collar in place.
3) Remove the top jacket panel. If possible, remove the rear and left side jacket panels.
4) Unplug the fan and remove the fan cover plate.
5) Disconnect the pressure switch hose.
6) Remove the burners.
7) Remove the two ¼-20 nuts and washers holding the flue collector onto the heat exchanger.
8) Score the silicone seal around the flue collector with a utility knife or similar tool.
9) Pry the flue collector off of the heat exchanger, being careful not to damage the flue collector or fan.
10) Clean the flue passageways using a stiff bristle brush. Be certain that all foreign material is removed from the gaps
between the pins.