


55
b. Using wire or fibre bristle brush clean crown of
boiler and inside of water legs.
c. Inspect target wall (903A only) for damage or
deterioration. If target wall is damaged, replace.
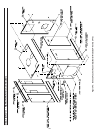
5. REASSEMBLE BOILER
CAUTION
Do not start the burner unless canopy,
smokepipe, burner mounting plate and all
flue plates are secured in place.
a. If removed, install the canopy taking care to
align the cerafelt strips. If strips are damaged
replace as needed.
b. Reinstall burner mounting plate to front section
making sure 3/16” diameter rope gasket is in
place and forms gas tight seal. If gasket is
damaged, replace.
c. Bolt burner to burner mounting plate. Inspect
gasket to assure adequate seal. Replace if
damaged. Connect oil line(s) and/or gas line(s).
d. Reinstall flue plates making sure gasket on each
plate is in place and forms gas tight seal. If
damaged, all edges of the cleanout plates should
be sealed with Silastic sealant when reinstalled
until insulation can be replaced.
e. If removed, reinstall jacket top.
f. Reinstall left side panels.
g. Reinstall smokepipe.
C. MAINTENANCE OF LOW WATER CUTOFF
DEVICES.
NOTICE
Probe and float type low water cutoff
devices require annual inspection and
maintenance.
1. PROBE TYPE LOW WATER CUTOFF
Although these devices are solid state in their
operation, the probe is exposed to possible
contamination in the boiler water and subject to
fouling.
It is important to physically remove the probe from
the boiler tapping annually and inspect that probe
for accumulation of scale or sediment.
Follow these steps to inspect, clean and/or replace
the probe:
a. Turn off electric service to the boiler.
b. Drain boiler water to a level below the tapping
for the probe.
c. Disconnect wiring connections between the low
water cutoff control and the probe.
d. Dismount the low water cutoff control from the
probe.
DANGER
Assure that the boiler is at zero pressure
before removing the LWCO probe. Do not
rely on the pressure gauge to indicate that
the boiler is at zero pressure. Open the
safety valve to relieve all internal pressure
prior to proceeding. Safety valve discharge
piping must be piped such that the potential
for burns is eliminated.
e. Unscrew the probe from the boiler tapping.
f. Inspect that portion of the probe that is exposed
to the boiler water for a scale or sediment
buildup.
g. Light deposits may be removed by wiping the
probe with a damp cloth. Wiping the probe
with a cloth soaked in vinegar will remove more
tenacious lime deposits. The most stubborn
deposits may be removed from the probe by
using a diluted amount (three 3 parts of water to
one (1) part) of phosphoric acid (H
2
PO
4
).
WARNING
Exercise caution when handling phosphoric
acid and follow the instructions on
container label. Always use protective
clothing and equipment when working
with/near chemicals.
h. Wire brushing of the probe is not recommended
as the soft platinum guard ring sandwiched
between the ceramic insulators may be damaged.
Care must be taken not to damage this ring in
any way or the useful life of the probe may be
shortened.
i. Clean the pipe threads of the probe to remove
old, hardened pipe dope and other foreign matter.
j. Apply a moderate amount of good quality pipe
dope to the pipe threads on the probe. Leaving
the two end threads bare. Do not use PTFE
(Teflon) tape.
k. Screw the probe into the boiler tapping.
l. Mount the low water cutoff control on the probe.
m. Reconnect the control to probe wiring.
n. Fill the boiler to its normal waterline.
o. Add boiler water treatment compound as needed.
p. Restore electric service to the boiler.
q. Fire burner to bring the water in the boiler to a
boil to drive off free oxygen.
r. BEFORE RETURNING BOILER TO
SERVICE Follow the low water cutoff checkout
procedure on Pages 46 and 47.