


65
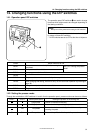
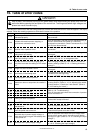
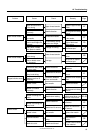
16. Table of error codes
LK3-B448E MARKII/BA-16
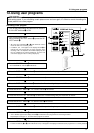
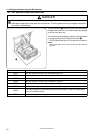
Wait at least 5 minutes after turning off the power switch and disconnecting the power cord from the
wall outlet before opening the face plate of the control box. Touching areas where high voltages are
present can result in severe injury.
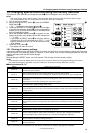
Machine motor operation error.
E-13
E-20
E-21
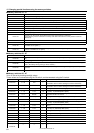
E-30
E-32
E-31
E-40
E-41
E-42
E-50
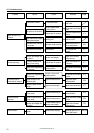
E-60
E-61
E-62
E-63
E-70
E-80
E-81
E-82
E-90
E-91
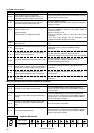
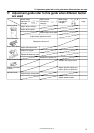
Cause
Machine specification select connector is not
connected properly.
Problem with machine motor stopping, or
synchronizer connection error.
Data is outside possible sewing area due to
enlargement ratio setting.
The data format of the user program (% or
mm) does not match the setting of DIP switch
A-6.
After changing the setting of DIP switch A-6, clear all
memory settings. (Refer to “15-1. Clearing all memory
settings”.)
Stitch pattern data overlaps the sewing area
when area limiting is active.
Length of a stitch exceeds 10 mm.
Abnormality in the sewing data.
Invalid program number specified.
Needle bar does not stop when the needle is
raised.
Presser has not been lowered.
Presser cannot be raised.
Presser is not raised.
Presser cannot be lowered.
Cooling fan does not operate.
Motor PROM is not correctly inserted.
Foot switch was depressed when the power
was turned on.
An operation panel switch was depressed
when the power was turned on.
Abnormal drop in power supply voltage, or
power was turned on again immediately after
it was turned off.
Abnormal rise in power supply voltage.
Remedy
Turn off the power and check if connectors P3 is
disconnected.
Turn off the power, and then turn the machine pulley to
check if the machine has locked up. Check the
synchronizer connection. Check if connectors P11, P12
and P13 are disconnected.
Turn off the power and check the ground wire
connection.
Press the RESET switch, and then set the enlargement
ratio again.
Press the RESET switch, and then reset the memory
switches “30” and “31” or enlargement ratio.
Press the RESET switch, and then set the enlargement
ratio again.
If programming a new sewing data, repeat the
procedure from the beginning.
Press the RESET switch and specify a correct number.
Turn the pulley to align the index mark with the needle
up stop position. (Refer to “10-12. Adjusting the needle
up stop position”.) Check the V-belt tension. (Refer to
“3-18. Installing the V-belt”.)
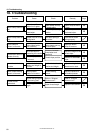
Refer to “18. Troubleshooting”.
Turn off the power and check the connection of presser
sensor connector P1.
Turn off the power, and then check if the cooling fan is
blocked with scraps of thread.
Turn off the power and check.
Turn off the power and check.
Turn off the power and check the operation panel.
Check that all panel cords are normal.
Turn off the power and check the input voltage. After
turning off the power, wait 3 seconds or more before
turning it on again. (Refer to “10-15. Checking the input
voltage”.)
Turn off the power and check the input voltage. (Refer
to “10-15. Checking the input voltage”.)
Code
16. Table of error codes
DANGER
If a malfunction should occur with the sewing machine, a buzzer will sound and an error code will appear in the display
window. Follow the remedy procedure to eliminate the cause of the problem.