


49
10. Adjustment
LK3-B448E MARKII/BA-16
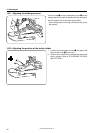
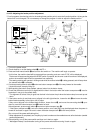
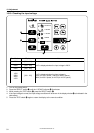
1. Turn on the power switch.
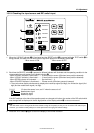
2. Check whether or not the feeder switch q is AUTO 1.
3. Press and hold manual switch w and turn the foot switch on. The machine will begin to operate.
* At this time, the machine head will be prevented from operating, and error code "E-C3" will be displayed.
The buzzer will stop sounding when the RESET switch is pressed, but the error code will continue to be displayed,
and so the machine head will still be prevented from operating.
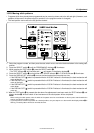
* The sewing machine will operate in inching mode while the manual switch w is being pressed, and will stop when
the manual switch w is released.
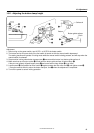
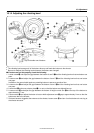
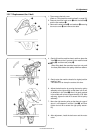
4. Continue pressing manual switch w and move button transport arm e all the way forward to the needle.
* Assist the button clamp by lifting up.
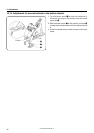
5. While pushing the button clamp upward, place a button into the button clamp.
6. Check that the button carrier pin is aligned with the hole in the button when the button transport arm e is as far
forward as it can go (to the needle side).
* The alignment is correct if the pin goes into the hole in the button the pin when the button clamp is moved up and
down.
7. If the button carrier pin and hole are not aligned in the left-right direction, loosen the bolt t and move the entire
button feeder assembly to the right or left to adjust.
If they are not aligned in the forward-back direction, loosen the nut y, and move the connecting shaft u up or
down to move the button transport arm e forward or back.
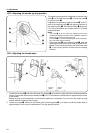
After adjustment, press manual switch w and return button transport arm e.
* If the button transport arm e is not at the home position, error code [E61] may be displayed when the power is
turned off and back on again. Be sure to return the button transport arm e to the home position.
(Do not turn off the power while doing this.)
* When adjustment is completed, turn the pulley by hand to make sure the needle does not strike the button (needle
position adjustment).
8. After adjusting, turn off the power switch and then turn it back on again.
* Wait approximately 5 seconds after turning off the power switch before turning it back on again.
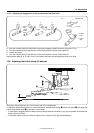
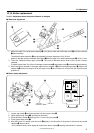
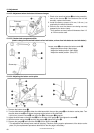
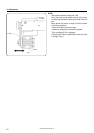
10-16-5. Adjusting the feeder position adjustment
Two holes Four holes
* For all programs, the shunting point for the sewing home position point is set to the first stitch position. As long as the
button size is not changed, it is not necessary to change the program in order to adjust the feeder position.
AUTO 1
AUTO 2
OFF
BA-16
L-R
F-B
w
q