


63
15. Changing special functions using the memory switches
LK3-B448E MARKII/BA-16
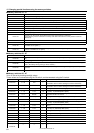
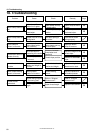
memo-00
memo-01
memo-02
memo-03
memo-04
memo-05
memo-06
memo-07
memo-08
memo-09
memo-0A
memo-0b
memo-0c
memo-0d
memo-0E
memo-0F
Motion when set to ON
At the end of sewing, the feed plate will be returned to the sewing start point via
mechanical home position.
Button clamp will move to the sewing start point, and then will be lifted.
(The button clamp rises at the final stitch to enable the quick taking out of the workpieces.)
Feed will move automatically to the next starting point at the same time as a user program
is switched.
(Normally it moves to the starting point after sewing starts.)
When sewing using programs, the programs which have been set will be sewn in
numerical order. (Cycle sewing mode is set.)
The sewing speed will be fixed at the minimum speed for the maximum pitch of the sewing
data.(Set this to ON if you are concerned that vartations in pitch may cause changes in the
sewing speed.)
Increases the presser solenoid lifting force
Enlargement and reduction ratio settings for X and Y become the same.
–
Test feeding is carried out stitch by stitch when the foot switch is depressed.
The sewing start point becomes the reference point for enlargements and reductions.
(The reference point for enlargements and reductions is normally the center of the sewing
frame.)
–
–
Needle stops in up position during emergency stop.
(EMERGENCY STOP switch is available as an option.)
The bar tacking stitches (with a pitch of less than 1 mm) are also enlarged and reduced.
(Normally stitches with a pitch of less than 1 mm are not enlarged or reduced.)
Test feeding will be performed at the same speed as that for actual sewing.
(This is used for checking feeding operation.)
After sewing is finished, the work clamp automatically opens and closes once
(practiceoperation).
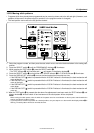
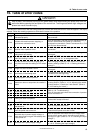
Switch
*
SELECT
PROGRAM NO.
RESET
COUNTER
X
-
SCALE
Y
-
SCALE
SPEED
P
TEST
BOBBIN.WIND
P4P3
P1 P2
POWER
r
t
w
y
e
15.
Changing special functions using the memory switches
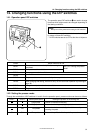
The functions of the switches on the operation panel q can be changed to carry out special functions.
NOTE:
After changing the memory switch settings, press the power switch to turn the power off and then back on again.
The memory switches “00 - 2F” (except “08”) are set to OFF at the time of shipment.
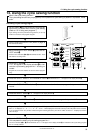
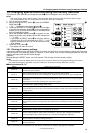
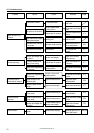
1. Turn on the power switch.
2. While pressing the TEST switch w, press the BOBBIN.
WIND switch e.
* “00 - - ” will appear in the display window r.
3. Press the DISPLAY SET switches t to set the two digits
at the left of the display window r to the corresponding
number (00 to 4F) of the function shown in the table below
that you would like to select.
4. When the BOBBIN. WIND switch e is pressed, the two
spaces at the right in the display window will change from
“ - - ” to “ON”.
* If you press the RESET switch y at this time, memory
switches from 00 to 2F will all be set to OFF (“--”), and
memory switches from 30 to 4F will be returned to their
initial settings.
5. Press the TEST switch w .
* The display will return to normal.
■Memory switches 00 - 0F
* Set to ON at the time of shipment from the factory, and when all memory settings are initialized.
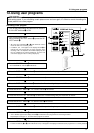
q
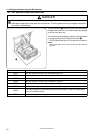
15-1. Clearing all memory settings
If the sewing machine stops operating normally, the cause may be that an incorrect memory setting may have been
made by means of the memory switch, for instance. In such cases, carry out the following procedure to clear the
memory, and also check the DIP switch settings.
[ Method ]
While pressing the RESET switch, turn on the power. This will clear all of the memory setting.
NOTE:
• This operation causes all settings stored in memory such as memory switch and user program settings to be cleared.
• If the optional emergency stop switch has been installed, you should reset memory switch No. 10 to ON.