


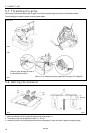
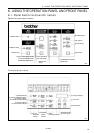

6. USING THE OPERATION PANEL AND FRONT PANEL
RH-9800
22
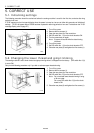
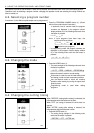
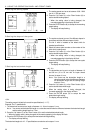
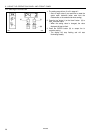
A.Setting the sewing speed
1. The sewing speed can be set to between 1000 - 2000
rpm in 11 100-rpm steps.
2. Press the "Up" button (L) or the "Down" button (K) to
set the desired sewing speed.
* When the setting value is being changed, the
numerals appearing in the display will flash.
3. Press the ENTER button (N) to accept the new sewing
speed setting.
* The display will stop flashing.
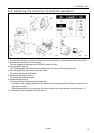
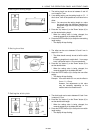
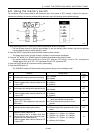
B.Setting the shape of the eyelet
1. The eyelet can be set to one of five different shapes in
accordance with the different shapes of knife.
The No. 2 knife is installed as the default knife for
standard specifications.
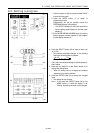
2. Select the same eyelet number as the number of the
knife which is being used.
3. Press the "Up" button (L) or the "Down" button (K) to
set the desired eyelet shape.
* When the setting value is being changed, the
numerals appearing in the display will flash.
4. Press the ENTER button (N) to accept the new eyelet
shape setting.
* The display will stop flashing.
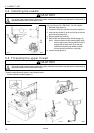
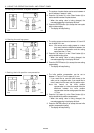
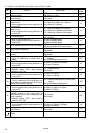
C.Setting the buttonhole length
<-00, -01>
1. The buttonhole can be set to a length of between 10
and 38 mm (10 to 50 mm with no looper thread
trimmer) in steps of 1 mm.
Note: You cannot set the buttonhole length to a
value that would make the difference between
the buttonhole length and the tacking length
less than 7 mm.
2. Press the "Up" button (L) or the "Down" button (K) to
set the desired buttonhole length.
* When the setting value is being changed, the
numerals appearing in the display will flash.
3. Press the ENTER button (N) to accept the new
buttonhole length setting.
* The display will stop flashing.
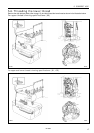
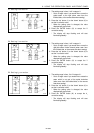
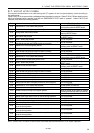
<-02>
The setting range is limited by the machine specifications (L1 - L7).
Example: For L1 specifications
1. The buttonhole can be set to a length of between 14 - 18 mm in steps of 1 mm.
Note: You cannot set the buttonhole length to a value that would make the difference between the buttonhole length
and the tacking length less than 7 mm.
2. Press the "Up" button (L) or the "Down" button (K) to set the desired buttonhole length.
* When the setting value is being changed, the numerals appearing in the display will flash.
3. Press the ENTER button (N) to accept the new buttonhole length setting.
* The display will stop flashing.
The buttonhole lengths for L2 - L7 specifications can also be set in steps of 1 mm.
1135Q
1134Q
(N)(L)(K)
1137Q
1136Q
(N)(L)(K)
1139Q
1138Q
(N)
(L)
(K)