


5. CORRECT USE
RH-9800
14
5. CORRECT USE
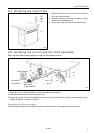
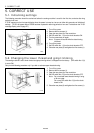
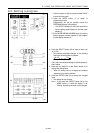
5-1. Initializing settings
The following procedure should be carried out before the sewing machine is used for the first time, and also after long
periods of non-use.
If "E-59" appears on the front panel display when the power is turned on, be sure to follow this procedure to initialize all
settings. ("E-59" will appear after a PROM has been replaced or after long periods of non-use. For details on the "E-59"
message display, refer to page 27.)
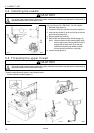
1. Turn off the power.
2. Remove the five screws (1).
3. Open the rear plate (2) of the control box.
4. Set DIP switch No. 1 (3) on the circuit board to ON.
5. Turn the power back on again.
Note: A buzzer will sound while the data is being
initialized.
6. Turn off the power.
7. Set DIP switch No. 1 (3) on the circuit board to OFF.
8. Close the rear plate (2) and tighten the five screws (1).
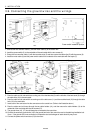
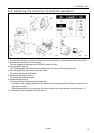
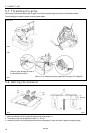
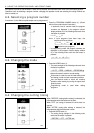
5-2. Changing the lower thread and gimp trimming
The sewing machine is set to lower thread and gimp trimming when it is shipped from the factory. (DIP switch No. 6 (3)
is set to ON.)
Carry out the following procedure only if you wish to activate upper thread trimming.
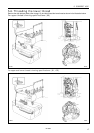
1. Turn off the power.
2. Remove the five screws (1).
3. Open the rear plate (2) of the control box.
4. Set DIP switch No. 6 (3) on the circuit board to OFF.
Note: Do not activate lower thread trimming if using
a 39-mm cutter.
Do not set DIP switch No. 6 (3) on the circuit
board to ON.
5. Close the rear plate (2) and tighten the five screws (1).
(2)
(1)
(3)
(2)
1120Q
(2)
(3)
(1)
1121Q