


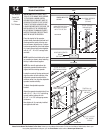


Tools Needed:
19
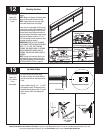
Please Do Not Return This Product To The Store. Contact your local Wayne-Dalton dealer. To find your local Wayne-Dalton dealer, refer to your
local yellow pages/business listings or go to the Find a Dealer section online at www.wayne-dalton.com
17
7/16” Socket
9/16” Socket
Ratchet Wrench
9/16” Wrench
Level
Step Ladder
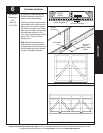
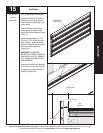
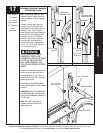
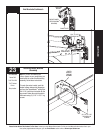
NOTE: If quick install flagangles were
installed in Step 16, skip this step and
continue with Step 18. If not, complete
this step.
To install horizontal track, place the
curved end over the top roller. Align
the bottom of the horizontal track with
the vertical track. If you have quick
install horizontal track, hand tighten the
horizontal track to the flagangle with
a studplate and (2) 1/4”-20 flange
hex nuts. If you have fully adjustable
horizontal track, hand tighten the
horizontal track to the flagangle with
(2) 1/4” - 20 x 9/16” track bolts and (2)
1/4”-20 flange hex nuts.
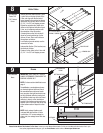
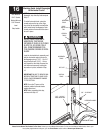
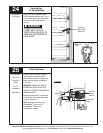
DO NOT RAISE DOOR UNTIL
HORIZONTAL TRACKS ARE
SE CURED AT REAR, AS OUTLINED
IN STEP 28, OR DOOR COULD
FALL FROM OVERHEAD POSI-
TION CAUSING SEVERE OR FATAL
INJURY.
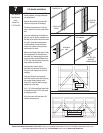
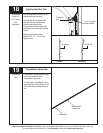
Level the horizontal track assembly and
bolt the horizontal angle to the slot in
the flagangle using (1) 3/8”-16 x 3/4”
truss head bolt and (1) 3/8”-16 hex nut.
Repeat for other side.
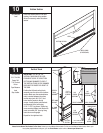
Remove the nail that was temporarily
holding the top section in place, installed
in Step 15.
IMPORTANT: FAILURE TO REMOVE NAIL
BEFORE ATTEMPTING TO RAISE DOOR
COULD CAUSE PERMANENT DAMAGE TO
TOP SECTION.
NOTE: If an idrive
®
opener will be
installed, position horizontal tracks
slightly above level.
WARNING
Attaching Adjustable Flagangles
to Horizontal Tracks
3/8” - 16 X 3/4”
TRUSS HEAD BOLT
3/8” - 16 HEX NUT
HORIZONTAL TRACK
HORIZONTAL ANGLE
INSTALLATION
1/4”-20 FLANGE
HEX NUTS
FLAGANGLE
STUDPLATE
QUICK INSTALL
HORIZONTAL TRACK
1/4”-20 FLANGE
HEX NUTS
FLAGANGLE
FULLY ADJUSTABLE
HORIZONTAL TRACK
1/4”-20 X 9/16”
TRACK BOLTS
QUICK INSTALL TRACK FULLY ADJUSTABLE TRACK