


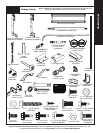

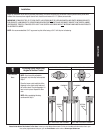
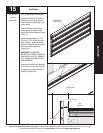

Tools Needed:
10
Please Do Not Return This Product To The Store. Contact your local Wayne-Dalton dealer. To find your local Wayne-Dalton dealer, refer to your
local yellow pages/business listings or go to the Find a Dealer section online at www.wayne-dalton.com
(2) 1/4”-14 X 5/8” SELF DRILLING SCREWS
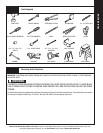
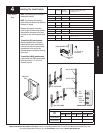
NOTE: Double car door struts are color
coded. 18 gauge (.046) have red ends. 20
gauge (.034) have blue ends.
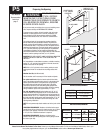
Bottom Section:
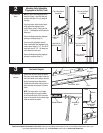
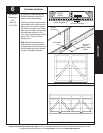
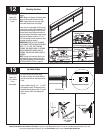
1. If your doors windload option code
begins with 06, place the U-Bar with the
notched ends over the bottom rib of the
bottom section, notches facing down.
Center U-Bar left to right on section.
If your doors windload option code begins
with 02, place the U-Bar with the notched
ends over the bottom rib of the bottom
section, notches facing down. The end
of the U-bar will fit between the bottom
bracket flange and the bottom section rib.
Center U-Bar left to right on section.
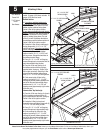
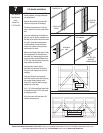
2. Fasten the U-Bar at each end through
the top flange with (1) 1/4”-14 x 7/8”
self drilling screw. If your doors windload
option code begins with 02, also fasten
the U-bar at each end to the bottom
section rib with (2) 1/4”-14 X 5/8” self
drilling screws, through the two holes in
the bottom bracket flange.
3. Place (2) 1/4”-14 x 5/8” self tapping
screws through each pre-punched hole at
each intermediate hinge location.
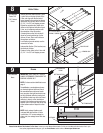
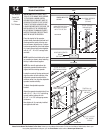
4. Place the U-Bar over the top rib of
the bottom section with the eight pre-
punched holes, facing up. Center U-Bar
left to right on section. Attach the U-Bar
at each end through the bottom flange
with (1) 1/4”-14 x 7/8” self drilling screw.
5. Finish securing the U-Bars to the
section, by placing (2) 1/4” -14 x 5/8”
self tapping screws midway between the
end of the door and intermediate hinge
locations and (1) 1/4” -14 x 5/8” self
tapping screw approximately eight inches
from each end.
Intermediate/ Top Section(s):
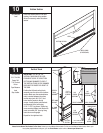
1. Place the U-Bar over the top rib of each
of the remaining sections with the (8)
pre-punched holes at the ends, facing up.
Center U-Bar left to right on section.
2. Fasten the U-Bar(s) at each end
through the top and bottom flange with (2)
1/4”-14 x 7/8” self drilling screws.
3. Place (2) 1/4”-14 x 5/8” self tapping
screws through each intermediate hinge.
4. Finish securing the U-Bar(s) to the
section, by placing (2) 1/4” -14 x 5/8”
self tapping screws midway between the
end of the door and intermediate hinge
locations and (1) 1/4” -14 x 5/8” self
tapping screw approximately eight inches
from each end.
Attaching U-Bars
1/4”-14 X 5/8” SELF
TAPPING SCREWS
U-BAR
NOTCHED U-BAR
1/4”-14 X 5/8”
SELF TAPPING SCREWS
1/4”-14 X 7/8”
SELF DRILLING
SCREWS
U-BAR
Power Drill
7/16” Socket
Driver
Saw Horses
5
BOTTOM SECTION
INTERMEDIATE SECTION
INTERMEDIATE SCREW
PLACEMENT
INTERMEDIATE SCREW
PLACEMENT
1/4”-14 X 5/8” SELF
TAPPING SCREWS
1/4”-14 X 7/8” SELF DRILLING
SCREWS
FOR OPTION CODES STARTING WITH 02
FLANGE
U-BAR
RIB
FOR OPTION CODES STARTING WITH 06