


VL SERIES STEAMER - SERVICE PROCEDURES AND ADJUSTMENTS
Pa
g
e 27 of 88
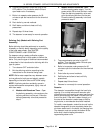
HIGH LIMIT THERMOSTAT
WARNING:
DISCONNECT THE ELECTRICAL
POWER TO THE MACHINE AT THE MAIN
CIRCUIT BOX. PLACE A TAG ON THE CIRCUIT
BOX INDICATING THE CIRCUIT IS BEING
SERVICED.
Remove thermostat (bi-metallic disk type) as
outlined under “HIGH LIMIT THERMOSTAT” in
“REMOVAL AND REPLACEMENT OF PARTS”.
Inspect the temperature sensin
g
side of thermostat
for corrosion or rust. Clean mountin
g
and thermostat
surfaces before remountin
g
or replacin
g
. A
g
ood
metal-to-metal contact is essential for proper
functionin
g
of the thermostat. This service must be
performed at least once a year. If thermostat matin
g
surface can not be throu
g
hly cleaned or is severely
pitted and rusted, then replace and check for proper
operation.
BOILER NOT FILLING WITH
WATER
Ensure that water to the steamer is turned on, then
turn power switch ON. After approximately 10
minutes, if no water is observed in the water level
g
au
g
e si
g
ht
g
lass, then check for a problem with the
boiler fill solenoid valve, water level control(s) or the
water level probes. See “WATER LEVEL
CONTROL TEST”. Also, ”water hammerin
g
” in the
supply line, in conjunction with a check valve can
cause a hi
g
h water pressure pocket in the water line
to the fill solenoid valve. The fill solenoid valve will
not be able to overcome this pressure and operate
to supply the boiler with water. Shut off the water
supply and relieve the pressure in the line. Turn the
water supply back on and check for proper
operation.
NOTE
: To eliminate this problem, the customer
must install a “water hammer suppression device” in
the supply line to the boiler.
WARNING:
DISCONNECT THE ELECTRICAL
POWER TO THE MACHINE AT THE MAIN
CIRCUIT BOX. PLACE A TAG ON THE CIRCUIT
BOX INDICATING THE CIRCUIT IS BEING
SERVICED.
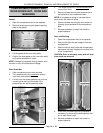
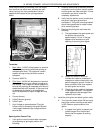
Scalants may be coverin
g
the water level control
probe
g
ivin
g
a false indication of a sufficient water
level in the boiler. Remove and thorou
g
hly clean the
water level probes to remove scalants and lime
build up. Also, Check throu
g
h the probe socket
openin
g
in the top of the canister assembly for the
presence of water.
Water must drain from the probe canister and if in
doubt, pour water into the canister and observe that
it drains quickly.
If water fails to drain from the canister, remove the
cover or canister assembly and clean. These
conditions indicate extremely poor water quality
bein
g
supplied to the boiler and/or boiler clean out
and delimin
g
has not been performed.
The water condition must be cleared up immediately
with a proper water conditioner to avoid further
problems with the steamer. Re-install the water level
probes and canister assembly (if applicable).
Perform a boiler inspection, clean-out and delimin
g
procedure as outlined under “BOILER”. Check for
proper operation.
Water may be drainin
g
throu
g
h an open boiler
blowdown solenoid valve as quickly as it’s fed to the
boiler. Loose wirin
g
, a burned out coil or particles of
scale trapped in the valve seat may prevent the
valve from closin
g
.
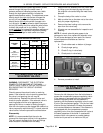
Newer steamer models use a plun
g
er type rod that
raises and lowers to permit steam/water flow out of
boiler. If debris has accumulated around the water
orifice, the plun
g
er may not seat properly to close
off the openin
g
. If this symptom is suspect, remove
the solenoid as outlined in “FILL AND COLD
WATER SOLENOID VALVES”. Remove any debris
found on sealin
g
surfaces, reassemble and install. If
the solenoid valve still does not function properly,
replace it with a new valve and check for proper
operation.
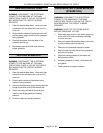
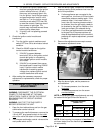
Older steamer models have a movable blade and
when closed, the blade reacts as a
g
uillotine that
should be free to move fully down into the valve
pocket (projection at bottom of valve) so that the
pierced hole in the blade ali
g
ns perfectly with the
body openin
g
. If debris has accumulated in the
bottom of the valve pocket, then the blade will not
move into the pocket completely. If this symptom is
suspect, remove the solenoid as outlined in “FILL
AND COLD WATER SOLENOID VALVES”.
NOTE:
On this valve body, remove the two
assembly bolts holdin
g
the brass body to
g
ether and
remove the loose internal parts. Remove any debris
found on sealin
g
surfaces, reassemble and install. If
the solenoid valve still does not function properly,
replace it with a new valve and check for proper
operation.
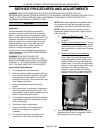
BOILER BLOWDOWN DRAIN
SOLENOID VALVE
The water contained in the boiler, bein
g
under
pressure, should be blown throu
g
h this valve and be
noticeably visible exhaustin
g
out the steamer drain.
Daily boiler blowdown is essential
to proper
operation and component life by removin
g
sediment
and scalants that may be lod
g
ed in the chamber of
the boiler.