EPA Calibration Protocol Model GFC7001E Carbon Dioxide Analyzer
Teledyne Analytical Instruments 219
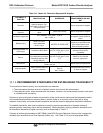
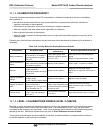
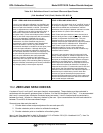
Table 10-1: Matrix for Calibration Equipment & Supplies
EQUIPMENT &
SUPPLIES
SPECIFICATION REFERENCE
ACTION IF
REQUIREMENTS ARE NOT
MET
Recorder
Compatible with output
signal of analyzer; min.
chart width of 150 mm (6 in)
is recommended
Return equipment to supplier
Sample line and
manifold
Constructed of PTFE or
glass
Check upon receipt Return equipment to supplier
Calibration equipment
Q.A. Handbook
1
Vol II Part 1 , App 15,
Sec. 4.4 & 5.4
Return equipment/ supplies
to supplier or take corrective
action
Detection limit
Noise = 0.5 ppm
Lower detectable
limit=1.0 ppm
40 CFR, Pt 53.20 & 23
2
Instruments designated as
reference or equivalent have
been determined to meet
these acceptance criteria.
Working standard CO
cylinder gas
Traceable to NIST-SRM
Analyzed against NIST-SRM;
40 CFR, Pt 50, App C; para.
3.1
3
Obtain new working
standard and check for
traceability
Zero air
Clean dry ambient air, free
of contaminants that cause
detectable response with
the CO analyzer.
40 CFR, Pt 50, App C; para.
3.2
3
Obtain air from another
source or regenerate.
Record form
Q.A. Handbook
1
Vol II Part 1 , App 15,
Table A-5 & A-6
Revise forms as appropriate
Audit equipment
Must not be the same as
used for calibration
Q.A. Handbook
1
Vol II Part 1 ,
App 15,
Sec. 4.4 & 5.4
Locate problem and correct
or return to supplier
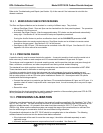
10.1.3. RECOMMENDED STANDARDS FOR ESTABLISHING TRACEABILITY
To assure data of desired quality, two considerations are essential:
The measurement process must be in statistical control at the time of the measurement.
The systematic errors, when combined with the random variation in the measurement process, must result
in a suitably small uncertainty.
Evidence of good quality data includes documentation of the quality control checks and the independent audits
of the measurement process by recording data on specific forms or on a quality control chart and by using
materials, instruments, and measurement procedures that can be traced to appropriate standards of reference.
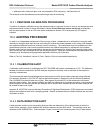
To establish traceability, data must be obtained routinely by repeat measurements of standard reference
samples (primary, secondary and/or working standards). More specifically, working calibration standards must
be traceable to standards of higher accuracy, such as those listed in Table 3-7.
Cylinders of working gas traceable to NIST-SRMs (called EPA Protocol Calibration Gas) are also commercially
available (from sources such as Scott Specialty Gases, etc.). See Table 3-7 for a list of appropriate SRMs.


