SMC sierra monitor corporation Sentry Instruction Manual - Version 6
APPENDIX G - MODEL 4314 OUTPUT EXPANSION PANEL
Page: 103
8.7 APPENDIX G - MODEL 4314 OUTPUT EXPANSION PANEL
8.7.1 EXPANSION PANEL DESCRIPTION
The Model 4314-01 Output Expansion Panel extends
Sentry low and high alarm capability by providing
individual single pole double throw (SPDT) dry contacts
for each alarm level for each module, and also provides
eight analog outputs for retransmission of the gas
concentration values for each sensor. Model 4314-01 is
an alternative option to Model 5392 and requires the
firmware enhancement. The panel is designed to be
installed as follows:
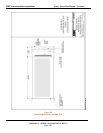
• Rack, Chassis and Wall Mount Controllers:
Mounted on stand-offs on the connector panel of
the controller, or installed on the back of spare
slots in 19” instrument shelf Model 5331-00.
• NEMA 4X Enclosure: Mounted on swinging
connector panel beside the display panel.
The panel connects to the Sentry controller via a ribbon
cable and a two conductor wire harness.
8.7.2 EXPANSION PANEL ASSEMBLY
Expansion Panels supplied with original Sentry shipments
are factory pre-assembled with the controller. For NEMA
enclosures, the panel is fully installed prior to shipment.
For other controllers minor final assembly is described
below.
Expansion Panels supplied as add-on to original Sentry
controllers require that the connector panel of the
controller be removed so that threaded stand-offs
(supplied) can be installed onto the four corners of the
panel.
8.7.3 INSTALLATION
The following are instructions for final installation and
wiring of the Output Panel:
1. Perform normal installation of the Sentry
controller and modules and perform function
checks of the basic system.
2. Power down the system.
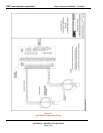
3. Plug the Output Expansion Panel connector
cable into the connector panel of the controller.
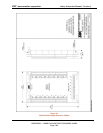
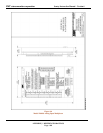
See J3 Figure 8-4 not required for NEMA
enclosures].
4. Connect the two position DC power connector
to Power (P) and Ground (G) on any channel of
the Sentry controller.
5. Mount the panel on the four stand-offs on the
connector panel of the controller [not required
for NEMA enclosures].
6. Make the necessary connections to the HIGH
and LOW relays for each of the Modules as
required for the particular application. Note that
these are dry contact relays and that power must
be connected from an external source.
7. Make the necessary connections to the analog
output terminals located across the lower side of
the panel. The outputs are preconfigured for
4-20 mA proportional to the full scale of the
corresponding input sensor module. The
outputs can be forced high or low for test
purposes by using diagnostic codes. See
Section 7.3.5
8.7.4 OPERATION
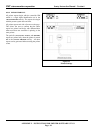
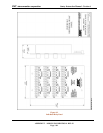
Figure 8-4 shows the location of the sixteen relays which
are (marked as "high" and "low" alarms for the respective
modules) and the eight analog outputs marked.
The analog outputs are always active except during
calibration when they are locked at 4 mA.
When any module connected to the controller is in alarm
it's respective relay will be energized.
To operate alarms or other auxiliary equipment connect to
the required relays according to the module number.
Several logic configurations are available:
• The user can configure each alarm as latching or
non-latching via the CHANGE MODULE menu
activity.
• A factory option available with the
Enhancement Package allows all high, or all low
alarms, or both, to be configured for alarm
acknowledge when latched.
• A factory option available with the
Enhancement Package allows alarm states to be
combined into zones and voting groups for
activation of individual relays.
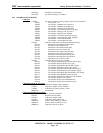
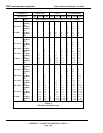
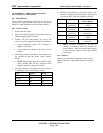
Table 8-2 is helpful for determining the relay actions
which will occur under various alarm conditions based on
the user’s configuration.


