


DV425TR DIRECT VENT ROOM HEATER
02/01 Page 43 250-5533
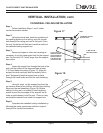
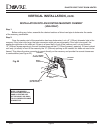
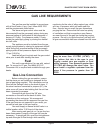
Step 9.
Attach the flex to the retro connector. Use
three sheet metal screws to attach the flex liner to the
connector (Figure 26). Mount the retro connector to
the masonry wall using masonry bolts. Re-drill larger
holes on connector as needed. Be careful to ensure
that the connector is centered in the opening and the
mounting holes line up with the masonry wall.
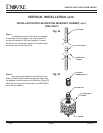
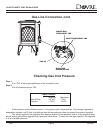
Step 10.
Slide wall thimble cover (SDV #940) over retro
connector and secure with masonry bolts (Figure 27).
If you have a framed wall in front of the masonry, use
wood screws to mount wall thimble cover to framed
wall, over retro connector and 10” (254mm) square
framed opening (Figure 22). If needed, add a section
of direct vent pipe to the retro connector in order to
extend through the opening in the wall thimble cover.
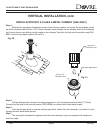
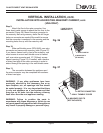
Step 11.
The connection between the appliance and
the retro connector may be completed with sections
of direct vent pipe.
WARNING: If any other appliances have been
previously attached to this masonary flue or an
open fireplace, etc., all openings into flue should
be sealed properly. It is very important that there
is only one appliance on a vent system and that
there are no air leaks into the masonry chimney
itself other than the vent appliance venting.
WARNING: Failure to position the parts in
accordance with these diagrams or failure to use
only parts specifically approved with this appliance
may result in property damage or personal injury.
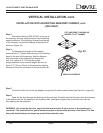
6" DIAMETER OPENING
IN MASONRY WALL
(3) MASONRY BOLTS
(NOT INCLUDED)
RETRO CONNECTOR
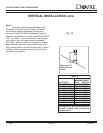
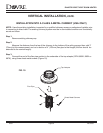
VERTICAL INSTALLATION, cont.
INSTALLATION INTO AN EXISTING MASONRY CHIMNEY, cont.
(USA ONLY)
Fig. 26
Fig. 27
(4) MASONRY BOLTS
(NOT INCLUDED)
RETRO CONNECTOR
WALL THIMBLE COVER