


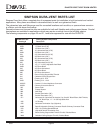

DV425TR DIRECT VENT ROOM HEATER
02/01 Page 16 250-5533
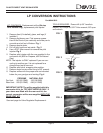
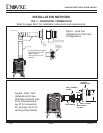
KIT CONTENTS: Blower motor; snapdisc bracket with wire
harness; rheostat, rheostat nut; knob; screws; 1 zip-tie.
TOOLS REQUIRED: #2 Phillips head bit; hand drill; 11/16's
wrench.
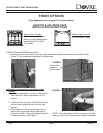
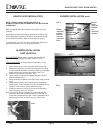
1. Mount blower to rear of unit using two screws. See Fig. 1
2. Beneath the stove from its front side, ensure that all wiring
is moved behind the blower mounting bracket, and complete
blower mounting by inserting two screws. See Fig. 2
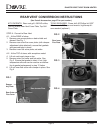
3. Make the wire harness connection. Fig. 2
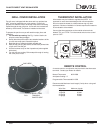
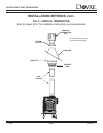
4. Use 2 screws to connect the snapdisc bracket to blower
mounting bracket. Fig. 3
5. Route wires from snapdisc to the right, upper edge of blower.
Fig. 3
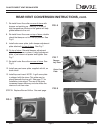
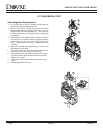
6. Insert rheostat control into it's opening from beneath the
control panel. Fit the rheostat nut on top and tighten the nut
using an 11/16" wrench. Attach black knob. Fig. 4
7. Gather any excess in the wiring and zip-tie to the switch
wires and piezo wire at rear of stove.
Note: This blower utilizes a snapdisc to control ON and OFF
operation. When the correct temperature is reached, the
blower will automatically turn ON. Use the rheostat knob to
adjust the fan to High or Low to suit your preferences.
FIG. 4
FIG. 1
FIG. 2
Blower
mounting
bracket
beneath
stove as
seen from
front.
Ensure
these
wires are
BEHIND
the
mounting
bracket.
Wire Harness
Connector
Blower from front
view beneath stove.
FIG. 3
Snapdisc Bracket
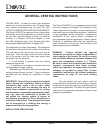
BLOWER INSTALLATION
PART #844-9030
Blower
rheostat
control
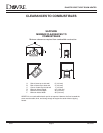
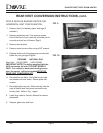
NOTE: HEARTH LEGS CAN NOT BE USED IF A
BLOWER IS INSTALLED AS THERE WILL NOT BE ENOUGH
CLEARANCE.
Refer to page 56, Parts & Accessories for specific color part
numbers.
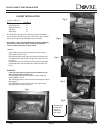
Hearth legs will allow three additional inches of clearance. Be
sure to calculate this distance correctly if necessary to cut wall
hole to install horizontally. Refer to Dimensions on page 7.
To change legs, use a 1/2" wrench to remove and replace one
leg at a time while the unit is in an upright position.
HEARTH LEGS INSTALLATION
BLOWER INSTALLATION, cont.