


3a. Flame sensing circuit failure.
3b. Soot on sensing rod.
3c. Blockage in heat exchanger.
3d. Blockage in main burner
orifice.
3a. Check flame sensing rod,
sensor ceramic, sensor lead
and connections for damage
or loss of continuity; Replace
defective elements.
3b. Clean off soot and adjust
pilot to smaller size.
3c. Clean heat exchanger.
Determine cause and
correct.
3d. Clean or replace orifice.
POSSIBLE CAUSE POSSIBLE REMEDY
4a. Faulty thermostat or
improper heat anticipator
setting.
4b. Defective ignition controller.
4c. Defective gas control.
4a. Check thermostat and
anticipator setting. Replace if
defective.
4b. Replace
4c. Replace.
POSSIBLE CAUSE POSSIBLE REMEDY
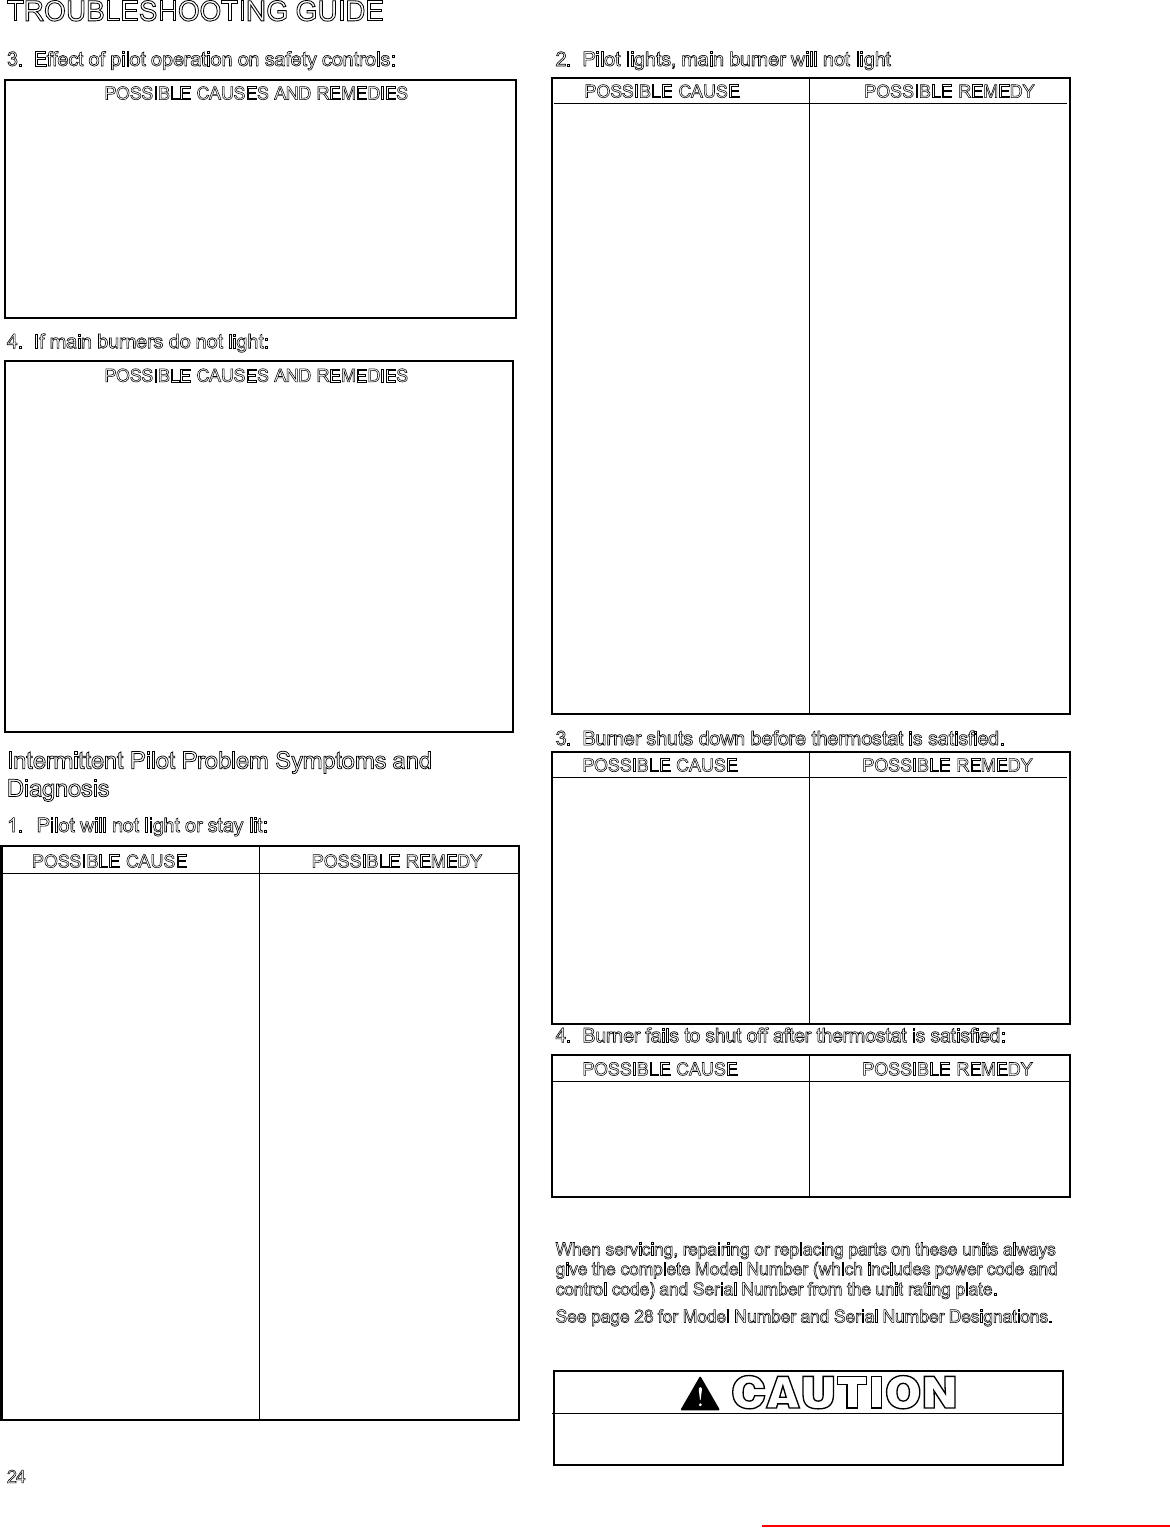
3. Effect of pilot operation on safety controls:
POSSIBLE CAUSES AND REMEDIES
3a. A short pilot flame may cause poor ignition and result in
the controls not opening the combination gas control or
reduce heat on thermocouple to the point where the
automatic controls become inoperative, thereby shutting
off gas supply to main burners. This may result from a
plugged orifice.
3b. Check electrical connection from the thermocouple
element to the safety valve to assure good electrical
contact. Also check location of pilot flame in relation to
thermocouple element.
4
. If main burners do not light:
POSSIBLE CAUSES AND REMEDIES
4a. Check that manual valve on combination gas control is in
ON position.
4b. Be sure pilot is lit, correctly positioned and strong enough
to ignite burner ports.
4c. Check wiring (electrical power supply) to combination gas
control.
4d. If unit is equipped with an ECO (energy cut-off device
located on rear panel of unit) check fuse in ECO and
make sure it has not blown and is operating correctly.
Caution: The ECO fuse should blow only if excessive unit
temperatures are experienced. If fuse is blown make sure
the cause of the unit overheating is found and corrected
before replacing the fuse and placing the unit back into
operation.
4e. If the above does not correct the condition, consult your
local gas company or local Modine representative.
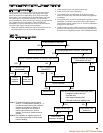
I
ntermittent Pilot Problem Symptoms and
Diagnosis
1. Pilot will not light or stay lit:
2. Pilot lights, main burner will not light
3. Burner shuts down before thermostat is satisfied.
4. Burner fails to shut off after thermostat is satisfied:
If a qualified service person cannot solve the problem, consult your
local gas company or Modine representative.
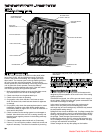
W
hen servicing, repairing or replacing parts on these units always
give the complete Model Number (which includes power code and
control code) and Serial Number from the unit rating plate.
See page 28 for Model Number and Serial Number Designations.
24
TROUBLESHOOTING GUIDE
2a. Gas valve in off position.
2b. System in lock-out mode.
2c. Cracked or broken sensor
ceramic.
2d. Defective or loose
connections to flame sensor
or flame sensor lead.
2e. Incorrect gas pressure.
2f. Insufficient current signal
from flame sensor.
2g. Incorrect or loose wiring.
2h. Poor ground to ignition
controller.
2i. No power to ignition
controller or gas valve
2j. Loose limit control
connections or defective
limit.
2k. Defective or plugged gas
valve regulator.
2l. Defective thermostat or
thermostat out of calibration.
2m.Thermostat heat anticipator
incorrectly set.
2n. Defective ignition controller.
2p. Blocked vent safety switch
tripped.
2a. Turn to on position.
2b. Reset system.
2c. Replace sensor.
2d. Correct or replace.
2e. Check and adjsut if
necessary to manufacturer’s
recommendations.
2f. Check current according to
manufacturer’s
recommendations and
replace if necessary.
2g. Check wiring.
2h. Check grounding means.
2i. Check voltage to controller
and gas valve.
2j. Check connections. Replace
limit control if necessary.
2k. Inspect gas valve regulator.
Replace if necessary.
2l. Calibrate thermostat or
replace if necessary.
2m.Check anticipator setting
and correct if necessary.
2n. Replace.
2p. Refer to page 20 for
instructions
CAUTION
Do not attempt to reuse ignition controllers which have been
wet. Replace defective controller.
1a. No spark at ignitor.
1b. Dirty or defective flame
sensor or loose connections
to flame sensor.
1c. Pilot valve electrical
connections loose.
1d. Defective pilot valve.
1e. Poor ground connections.
1f. No power from control
transformer.
1g. Spark not located in pilot gas
stream.
1h. Dirty or plugged pilot orifice.
1i. Pilot line kinked or
obstructed.
1j. Pilot flame too low.
1k. Flame sensor out of position.
1l. Defective ignition controller.
1a. Check connections. Check
for proper spark gap, cracked
or broken electrode ceramic,
blown controller fuse or
brittle, cracked or loose high
tension cable. Check power
exhauster pressure switch.
Replace if defective.
1b. Check milli-ampls of sensor.
Tighten loose connections.
Clean sensor with steel
wool. Replace flame sensor
if necessary.
1c. Tighten connections.
1d. Replace.
1e. Check grounding means.
1f. Check transformer voltage
on secondary side for 25v.
1g. Correct or replace pilot.
1h. Clean or replace.
1i. Correct or replace pilot line.
1j. Check pilot flame and adjust
per valve manufacturer’s
recommendations.
1k. Reposition.
1l. Replace.
POSSIBLE CAUSE POSSIBLE REMEDY
POSSIBLE CAUSE POSSIBLE REMEDY
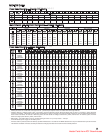
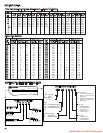
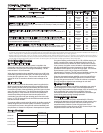
Heater Parts from ACF Greenhouses