


53Heat & Glo • XLR-N-AU, XLR-PB-AU • 2198-906 Rev. M • 5/12
A. RemoveFixedGlassAssembly
See Section 14.E.
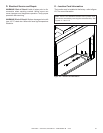
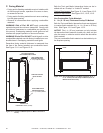
B. RemovetheShippingMaterials
Remove shipping materials from inside or underneath the
rebox. The standard black rock media and manual bag
assembly are also shipped underneath the rebox.
C. CleantheAppliance
Clean/vacuum any sawdust that may have accumulated
inside the rebox or underneath in the control cavity.
D. Accessories
Install approved accessories per instructions included
with accessories. Contact your dealer for a list of ap-
proved accessories.
WARNING! Risk of Fire and Electric Shock! Use ONLY
Hearth & Home Technologies-approved optional acces-
sories with this appliance. Using non-listed accessories
could result in a safety hazard and will void the warranty.
14
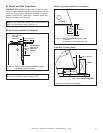
ApplianceSetup
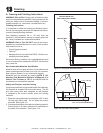
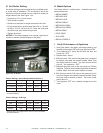
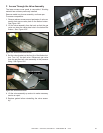
Figure14.1FixedGlassAssembly
E. FixedGlassAssembly
WARNING! Risk of Asphyxiation! Handle xed glass
assembly with care. Inspect the gasket to ensure it is
undamaged and inspect the glass for cracks, chips or
scratches.
• DO NOT strike, slam or scratch glass.
• DO NOT operate replace with glass removed, cracked,
broken or scratched.
• Replace as a complete assembly.
RemovingFixedGlassAssembly
1. Remove the decorative front.
2. Locate the two spring latches that are on the upper left
and right of the replace.
3. Use both index ngers to release spring latches. See
Figure 14.1.
4. Allow glass to tilt forward. Grasp glass on the upper
right and left sides and lift glass “up” and “out.”
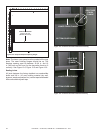
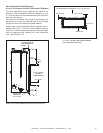
ReplacingFixedGlassAssembly
1. Locate glide tabs on lower left and right corners.
2. Grasp glass on upper right and left sides and tilt bot-
tom of glass assembly toward replace.
3. Allow of the bottom gasketing of the glass assembly to
touch the face of the replace.
4. Put pressure on the glass as you allow the glass assem-
bly to drop into the two lower tabs. See Figure 14.1.
5. Tilt top of glass towards replace and engage both top
spring latches
LOWER GLASS CLIP
UPPER SPRING LATCH
F. InstalltheMesh
The mesh front is included with the Tonic front. The Mar-
tini tinted glass front does not include mesh.
1. Remove xed glass assembly as instructed.
2. Place glass assembly into mesh screen such that the
four mesh clips attached to the mesh assembly snap
into the four corresponding slots on the xed glass as-
sembly.