


Heat & Glo • ESC-42ST • 2146-900 Rev. o • 5/1234
CAUTION! Risk of Cuts, Abrasions or Flying Debris.
Wear protective gloves and safety glasses during instal-
lation. Sheet metal edges are sharp.
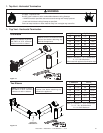
NOTICE: This appliance is top vented ONLY.
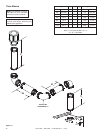
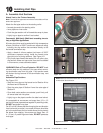
1. Remove shrink wrap from appliance.
A. Top Vent
9
9
Appliance Preparation
NON-COMBUSTIBLE ASSEMBLY
NON-COMBUSTIBLE ASSEMBLY
AND FINISHING STRIPS
AND FINISHING STRIPS
Figure 9.1 Packaged Appliance.
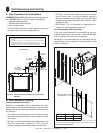
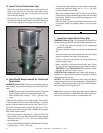
2. The seal cap, shown in Figure 9.2, is included to pre-
vent construction material from getting into appliance.
Remove seal cap when pipe installation phase begins.
Figure 9.2 Seal Cap.
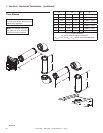
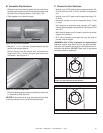
3. Remove the two non-combustible assemblies by re-
moving the two 1/4 in. screws fastening the non-com-
bustible assemblies to the appliance. See Figure 9.3.
SHIPPING BRACKET SCREWS
SHIPPING BRACKET SCREWS
FINISHING STRIPS
FINISHING STRIPS
Figure 9.3 Shipping Brackets and Finishing Strip Locations.
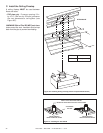
4. Six sheet metal fi nishing strips are included with the
appliance. The shipping location of the fi nishing strips
is shown in Figure 9.3. Remove 1/4 in. screws that at-
tach the strips to the appliance. Strips may be used
during the fi nal fi nishing steps of appliance setup. See
Figure 9.7. Strips should be removed when fi nishing
is completed.
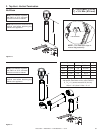
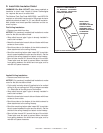
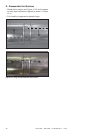
Figure 9.4.
SPLATTER GUARD
SPLATTER GUARD
OUTER HEARTH
OUTER HEARTH
REFRACTORY
REFRACTORY
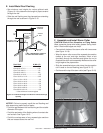
Figure 9.5 Mesh Rod Location, Gas Valve Side of Appliance.
MESH RODS (2)
MESH RODS (2)
SEAL CAP
SEAL CAP
4. Once the appliance is fi nished into the wall and is
ready for fi nal installation, remove the rest of the com-
ponents.