


28
MAINTENANCE
A qualified service agency should conduct an annual inspection and maintenance of your FireLuxe includ-
ing the overall installation and venting to keep it running safely. The following procedures should be per-
formed only by a qualified service person. The gas supply should be turned off and the stove should be
completely cool whenever a maintenance procedure is performed. All parts of the appliance that are removed for
servicing must be replaced prior to operation.
WARNING: Do not operate the appliance with the glass front removed, cracked or broken.
Replacement of the glass should be done by a qualified service person.
WARNING: Use only replacement glass, part number 3-40-21001500 and glass gasket, part number
3-44-00539. Do not use substitute materials. Do not strike or slam the glass front.
REPLACING THE GLASS
The glass mounting system consists of the glass panel, special glass gasket and the metal glass frame.
Should the glass need to be replaced, you must use the glass replacement parts that can be obtained from
your authorized Harman dealer. When replacing the glass, you must use a new glass gasket. Use the follow-
ing procedure and refer to the illustrations on pages 14 and 17 of this manual.
1. Turn the stove completely off and allow it to cool completely.
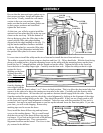
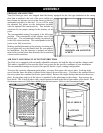
2. Remove the Stove Top and Stove Front. See instructions on page 14.
3. If the glass is broken, be sure to wear gloves and eye protection.
4. Unlatch the three glass frame latches by pulling forward on the latch finger tabs while lifting up. This
will allow the glass frame to tip slightly forward. The glass is loose in the frame, held in place only by
friction from the gasket so it is very important to support both the glass and the frame when handling.
Place your thumbs on the outside of the glass frame and wrap your fingers around the frame and onto
the glass. Squeeze the frame and glass while moving. Carefully lift the glass frame and glass up and off
the stove. Set the glass and frame aside on a padded surface. If the glass is broken, do this over spread
out newspaper to catch all loose material. The outside of the frame should be facing down to give ac-
cess.
5. Carefully remove the old glass and gasket material. If the glass is broken, wear gloves and eye protec-
tion.
6. Be sure to remove any broken glass from the burner and logs.
7. Install the new glass gasket onto the glass panel following the instructions included with glass panel.
8. With the thin section of the glass gasket facing the inside of the glass frame, carefully press the new
glass panel/gasket assembly into the glass frame by first inserting the top edge under the two gasket re-
tainers and then pressing the sides and bottom edge into the frame.
9. Carefully pick up the glass and glass frame assembly by grasping the sides of the frame and using your
thumbs and fingers to hold the glass in place within the gasket and frame.
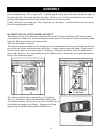
10. With the glass frame (and glass) at a slight angle (leaving room for your fingers between the frame and
the firebox) insert the bottom edge of the frame into the frame retainer located on the bottom front of
the firebox. Take care to center the frame from left to right. Once the bottom edge is in place, move
your fingers out of the way and press the top of the frame against the firebox while pushing down to be
sure the frame is fully engaged in the frame retainer. Hold the frame in place with one hand and engage
the three glass frame latches by pulling out and down while hooking them over the frame.
11. Replace the Stove Front and Stove Top. See instructions on page 18.
CLEANING THE GLASS
WARNING: Never clean the glass while it is hot. Do not use abrasive cleaners or cleaners containing
ammonia.
NOTE: A micro-fiber cleaning cloth and plain water is recommended by the glass manufacturer.
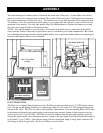
BATTERY REPLACEMENT
When the batteries need replacement, the remote handset shows a low battery indicator “BATT”. The Igni-
tion and Control Module will give three short beeps when the valve motor operates. The cooking burner
Ignition Module will stop sparking. See the instructions on pages 19 - 20 for details on changing batteries.