


22
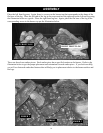
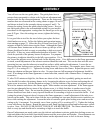
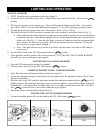
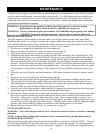
You will now see the two guide plates. The guide plates have a
pointer that corresponds to a letter scale for the air adjustment and
number scale for the exhaust adjustment. These are the letters and
numbers that are referenced in the venting charts on pages 10 and 11
and shown in detail in the examples shown on pages 8 and 9. To
change the setting, loosen the guide plate locking screws. Next ro-
tate each guide plate to the recommended setting for your installa-
tion shown in the appropriate venting chart for natural gas or for pro-
pane (LP) gas. Once the settings are correct, tighten the locking
screws.
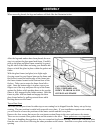
It is a good idea to test fire the stove before you replace the heat
shield and access cover. Follow the lighting and operation instruc-
tions starting on page 23. Allow the stove to burn for at least 20-30
minutes at high fire while observing the flame. Although the flames
will become more luminescent as the stove heats up, the tips of the
flames should not be dark or sooty or extending so high as to touch
the baffle. If they are, some additional adjustment is needed. First,
check the position of the primary burner air adjuster. For propane,
the primary air adjuster should be in the fully-open position. If it is
not, loosen the adjuster screw locknut back out the adjuster screw. If no difference in the flame appearance
is noted, a small adjustment of the exhaust restrictor should be tried next. This can be done with the stove
operating but care must be taken not to touch hot surfaces while making the adjustment. Loosen the ex-
haust guide plate locking screw and move the setting down by ¼ increment. For example, move from a set-
ting of 6 ½ to a setting of 6 ¼ . Tighten the locking screw and observe the flames. Repeat the process until
flame tips shorten and become lighter in color. No more than one full increment of adjustment should be
used. If no change in the flame appearance is noted after that, consult with a Harman Stove Company rep-
resentative.
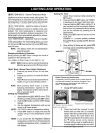
If, after 20-30 minutes at high fire, the flames are short or blue, the fire is probably getting too much air.
You should first reduce the primary burner air by loosening the adjuster screw locknut and turning the ad-
juster screw in one turn. See the illustration on page 21 for the location of the primary air adjuster screw.
Wait a few minutes and observe the flames again. Make another one turn adjustment. If the flame appear-
ance has not changed after two turns of the adjuster screw, it is likely that there is another cause for the
short or blue flames. Note: Do not turn the primary air adjustment screw in more than two turns. The
flames should not have dark or sooty tips and should not be extending so high as to touch the baffle. If ad-
justing the primary burner air doesn’t improve the flame appearance, a small adjustment of the inlet air re-
strictor can be made. This can be done with the stove operating but care must be taken not to touch hot sur-
faces while making the adjustment. Loosen the inlet air restrictor guide plate locking screw and move the
setting up by ¼ increment. For example, move from a setting of E to a setting of E ¼. Tighten the locking
screw and observe the flames. Repeat the process until flame tips begin to extend and become more yellow
in color. Note: DO NOT OVER-ADJUST THE INLET AIR RESTRICTOR. The flames should not have
dark or sooty tips and should not be extending so high as to touch the baffle.
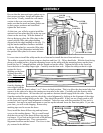
Once all adjustments are made, make sure the inlet air and exhaust restrictor guide plate locking screws are
tight and replace the heat shield, heat shield fastener and the access plate and fastener. If an adjustment was
made to the primary burner air, tighten the locknut on the adjustment screw to lock in the new setting.
EXHAUST RESTRICTOR
GUIDE PLATE
INLET AIR
RESTRICTOR
GUIDE PLATE
LOCKING
SCREWS
ASSEMBLY