


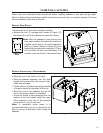
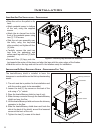


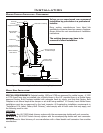

• Place the unit on the pallet on its
back.
• Attach pedestal spacer to bottom
of the unit, using the supplied
screws.
• Attach the air channel box to the
front of the pedestal spacer using
two (2) T-20 screws.
• Slide the ash pan assembly over
the bolts, using the key-holed
slots provided, and tighten all four
(4) bolts.
• Carefully remove the cast iron
legs from the packaging and
secure each leg with two (2) bolts
provided.
• Secure all four (4) legs, push the
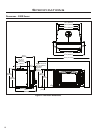
Figure 17: Installing Legs and Ash Pan Assembly.
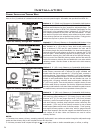
Installation
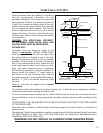
LEGS AND ASH PAN INSTALLATION - FREESTANDING:
The heat-efciency shield is installed to lower the
clearances to combustibles on the at top freestanding
model.
1. The unit must be in position for the installation and
with the venting ready to be assembled.
2. Loosen the two (2) top screws on the back of the
unit using a
5
/16” socket.
3. Place the heat-efciency shield on top of unit.
4. Slide chimney connector through the heat-efciency
shield and over the ue.
5. Lift the heat-efciency shield and screw the chimney
connector to the ue.
6. Slide the heat-efciency shield down and hook the
slot at the back of the shield, around the loosened
screws at the back of the unit.
7. Tighten the two (2) screws at the back.
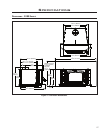
Figure 18: Installing Heat Shield.
leg towards the center of the stove and align the legs with the outer edges of the rebox.
• Stand the unit on the legs and set the unit in the location ready for installation.
INSTALLATION OF HEAT-EFFICIENCY SHIELD - FREESTANDING FLAT TOP:
22