


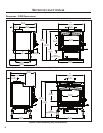
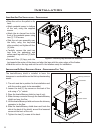


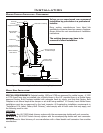

Installation
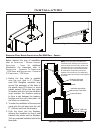
Hearthpad
Floor
Pedestal
Woodstove
Optional
fan
Outside air connection
through wall or floor
Chimney
connector
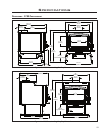
Ceiling
Insulated chimney
Roof flashing
Roof
Roof radiation
shield (if required)
Minimum air space
in accordance with
chimney manufacturer.
Wall support
Chase
(optional)
Insulated corner
Minimum
18" (475 mm)
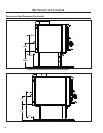
Rai
n c
a
p/
Spa
rk
ar
re
s
t
o
r c
ap
Storm Collar
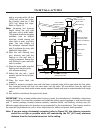
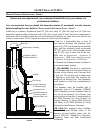
and in any area within 10 feet
(304.8 cm) of the roof ridge,
the chimney must be 2 feet
(60.9 cm) above the ridge.
Refer to Figure 24.
Note: Increasing the chimney
height above the roof may
help your unit to draft better.
This greater draft can decrease
problems such as difcult
start-ups, smoke coming out
when door is open, and dirty
glass. You may initially try
the minimum required height
and if problems do arise, add
additional height later.
10. Slide the roof ashing over
your chimney and seal the
ashing to the roof with a
roong compound. Secure the
roof ashing to your roof with
nails or screws.
11. Place the storm collar over the
ashing and seal the joints
with silicone caulking.
12. Fasten the rain cap / spark
arrestor cap to the top of your
chimney.
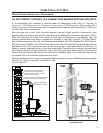
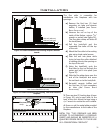
13. Place the stove back into
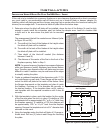
Figure 26: Standard Horizontal Installation.
position.
14. Install the chimney connector pipe with the lower (crimped) edge of the pipe inside the ue collar.
Any creosote formed will then run back down into the stove. All connections must be tight and
secured with three sheet metal screws equally spaced. Double wall pipe is recommended over single
wall.
15. Also install an outside air ex pipe to the stove.
IMPORTANT: When a metal prefabricated chimney is used, the manufacturer’s installation instructions
must be followed. You must also purchase and install the ceiling support package or wall pass-through
and “T” section package, restops (where needed), insulation shield, roof ashing, chimney cap, etc.
Maintain proper clearance to the structure as recommended by the manufacturer. The chimney must be
the required height above the roof or other obstructions for safety and proper draft operation.
Note: If you are using a horizontal connector (refer to Figure 26), the chimney connector
should be as high as possible while still maintaining the 18” (475 mm) minimum
distance from the horizontal connector to the ceiling.
26