


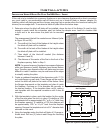


The ue collar is removable for
installations into replaces with low
openings.
a) Remove the rst two (2) front
secondary air tube and ceramic
bafes, if installed (see CERAMIC
BAFFLE INSTALLATION).
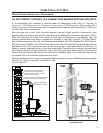
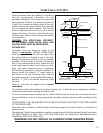
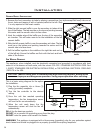
b) Unscrew the nut on top of the
inside of the rebox, using a
9
/16”
wrench or socket (see Figure 34).
The ue plate clamp will slide off
the hook/clamp.
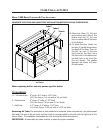
c) Pull the hook/bolt and the
removable ue collar off the top
of the unit.
d) Attach the ue collar to the venting
pipe using sheet metal screws.
e) Push the unit into place while
trying to keep the collar attached
to venting close to the opening on
the top of the unit.
f) Using the hook/bolt, grab the
ue collar by the rod through the
center and pull it into place (see
Figure 35).
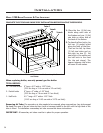
g) Slide the ue plate clamp over the
end of the hook/bolt and screw
the nut back on to the hook/bolt.
h) Re-install ceramic bafes and
the rst two (2) front secondary
air tube (see CERAMIC BAFFLE
INSTALLATION).
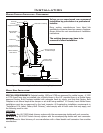
3. There are two (2) leveling legs (shown
in Figure 36), one on each side, at the
back of the unit. Adjust the legs using a
9
/16” wrench to ensure the unit is stable.
4. Screw or nail the metal plate provided
by the manufacturer to the inside of the
replace.
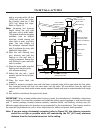
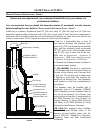
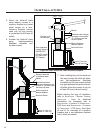
Combustible Floor
Masonry Fireplace
USA 16” (406 mm)
CND 18” (450 mm)
1" (25mm)
Non-Combustible Board (K 0.84)
Figure 33: Insert Installation into existing oor level masonry
replace.
Installation
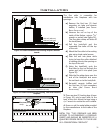
Floor Protection
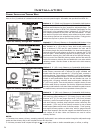
Combustible Floor
Masonry Fireplace
8"
(203 mm)
USA 16” (406 mm)
CND 18” (450 mm)
Figure 32: Insert Installation into existing replace without
hearth.
METAL TAG: “THIS FIREPLACE HAS BEEN
ALTERED TO ACCOMMODATE A FIREPLACE
INSERT AND SHOULD BE INSPECTED BY A
QUALIFIED PERSON PRIOR TO THE RE-USE
AS A CONVENTIONAL FIREPLACE.”
Nut
Hook/bolt
Flue plate
clamp
Figure 34: Attaching removable ue.
31