


www.desatech.com
118531-01A10
VENTING INSTALLATION
INSTRUCTIONS
NOTICE: Read these instruc-
-
These models are tested and approved for use
with DESA/Vexar (direct-vent) pipe components
and terminations.
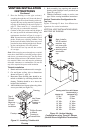
The venting system must terminate on the outside of
the structure and can not be attached to a chimney
or ue system serving a separate solid fuel or gas
burning appliance. A direct-vent appliance must
have its own venting system. DO NOT common
vent this appliance.
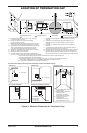
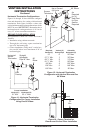
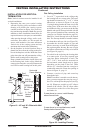
This model is approved to be vented either
horizontally through an outside wall or vertically
through a roof or chase enclosure using the fol-
lowing:
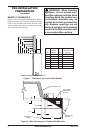
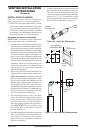
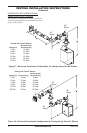
• When venting system terminates horizontally
on an outside wall, you may install a standoff
if the termination cap is to be installed directly
on a combustible nish such as vinyl, wood,
stucco, etc.
• Never run the vent downward as this may
cause excessive temperatures which could
cause a re.
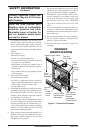
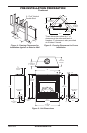
• Vent pipe air space clearances to combustibles
are 1" on all sides except on the horizontal
sections, which requires 2" clearance from
the top of the pipe. Where the termination cap
penetrates a combustible wall, 1" air space
clearance is required.
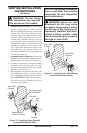
• Have replace and selected vent components on
hand to help determine the exact measurements
when elbowing or offsetting. Always use wall
restops when penetrating walls, ceilings or
attic spaces.
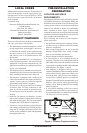
• Install horizontal venting with a 1/4" rise for
every 12" of run toward the termination.
WARNING: Read all instruc-
Failure to do so could result in
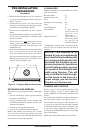
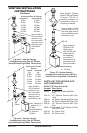
IMPORTANT: Do not seal vent cap to pipe. Cap
must be removable for servicing.
NOTICE: Failure to follow these in-
NOTICE: Do not seal termination
INSTALLATION PRECAUTIONS
• Wear gloves and safety glasses for protection
• Use extreme caution when using ladders or
when on roof tops
• Be aware of electrical wiring locations in walls
and ceilings
The following actions will void the warranty on
your venting system:
• Installation of any damaged venting com-
ponent
• Unauthorized modication of the venting system
(Do not cut or alter vent components)
• Installation of any component part not manu-
factured or approved by DESA/Vexar
• Installation other than as instructed by these
instructions