


Eclipse Bi-Flame v1.8, Instruction Manual 826, 05/03
17
History Log (continued)
4) Release the ENTER key and the most recent lockout message
will display for seven seconds.
5) If you wish to see the next lockout message, press and release
the ENTER key before the seven second time duration ends of
the most recent lockout message display. This will prompt the
next lockout message. If desired, continue this procedure until
the maximum of ten lockout messages has been displayed (re-
member that the highest record number is the most recent
lockout message).
6) Continued pressing and releasing of the ENTER key in less than
seven seconds keeps the history log active and repeats the lock-
out message list; waiting longer than seven seconds deactivates
the history log mode and the next display is the last sequence
message before the history log was activated. For example, if the
message “LIMITS OPEN” was displayed when the history log was
activated, then that message will appear again after seven seconds.
7) If you wish to erase all of the lockout messages from the his-
tory log, press the RESET and ENTER keys simultaneously
while the history log is active. Release the RESET key, but hold
the ENTER key for another five seconds. Wait five seconds and
press and release the RESET key.
Modulation Contacts
The modulation feature incorporates “drive high”, “drive low”, and
“automatic” contacts into the purge sequence. This feature allows
the Bi-Flame to sequence internal dry contacts which can be used
by the customer requiring a high fire purge of the combustion
chamber before ignition.
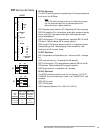
The high fire purge time is selectable by means of S2 DIP switches
on the logic board (see “S2 DIP Switch Settings” on page 13)
With this option, the modulation terminals on J3 terminal strip will
sequence as follows:
Sequence Step Internal Contact Connections
High Fire Purge Terminal 1 (COMMON) to Terminal 3 (HI FIRE)
Low Fire Start Terminal 1 (COMMON) to Terminal 4 (LOW FIRE)
Automatic Terminal 1 (COMMON) to Terminal 2 (AUTO)
Post Purge Terminal 1 (COMMON) to Terminal 4 (LOW FIRE)
Power Off Terminal 1 (COMMON) to Terminal 2 (AUTO)
Power On/Limits Off Terminal 1 (COMMON) to Terminal 4 (LOW FIRE)
Alarm Terminal 1 (COMMON) to Terminal 4 (LOW FIRE)
The Automatic step occurs 20 seconds after the main output has
energized (see Table 10.1 beginning on page 36) and allows the
burner firing rate to be controlled by an automatic temperature
controller.