


SKU 65712 For technical questions, please call 1-800-444-3353. Page 16
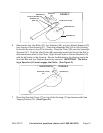
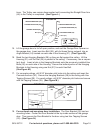
tions. The Trolley can remain disconnected until connecting the Straight Door Arm
(46) to the Trolley is completed. (See Figure L.)
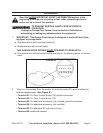
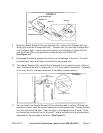
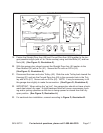
FIGURE M
HEX
BOLT
(26)
NUT (27)
NUT (27)
HANGING BRACKET (28)
HANGING BRACKET (28)
CONCRETE ANCHOR (30)
CONCRETE ANCHOR (30)
TAPPING SCREW (29)
TAPPING SCREW (29)
26
27
29
30
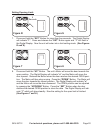
15. Lift the garage door to its full open position, and rest the Garage Door Opener on
the garage door. Insert one Hex Bolt (26), with its thread facing outward, into an
Angle Bracket (24) located on each side of the Housing (31). (See Figure M.)
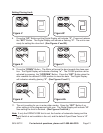
Bend the two Hanging Brackets (28) so they are at against the ceiling. Lift the 16.
Housing (31) until the Rail (35) is parallel to the ceiling. If necessary, use a carpen-
ter’s level. Insert a hole in the Hanging Brackets onto the previously installed Hex
Bolts (26) on each side of the Housing. Secure the bottom portion of the Hanging
Brackets to the Housing using one Nut (27) for each Hex Bolt.
(See Figure M.)
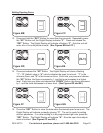
For concrete ceilings, drill 5/16” diameter pilot holes into the ceiling and insert the 17.
Concrete Anchors (30). Secure the Hanging Brackets (28) to the ceiling with Hex
Tapping Screws (29). For wood ceilings, drill 5/32” diameter pilot holes and secure
with the Tapping Screws (29). (See Figure M.)
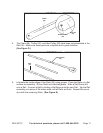
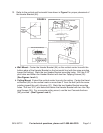
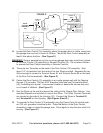
FIGURE N
HEX
TAPPING
SCREW
(53)
DOOR
BRACKET
(50)
DOOR
BRACKET
(50)
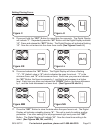
18. For sectional and one-piece door installation: The Door Bracket (50) has two
mounting holes. Center the Door Bracket at the top inside surface of the garage
door. Then secure the Door Bracket to the door using two Hex Tapping Screws
(53). (See Figure N.)