


Names of Machine Parts and Their Functions 3
1
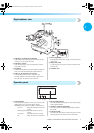
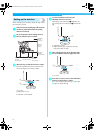
Right-side/rear view
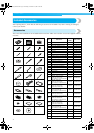
1 USB Type “A” (host) port connector
When using USB media, plug the USB media into the
USB Type “A” (host) port connector.
2 Embroidery card slot
Insert the embroidery cards (sold separately) into the
embroidery card slot.
3 Handwheel
Rotate the handwheel to move the needle up and down.
Be sure to rotate the handwheel counterclockwise.
4 USB Type “B” (function) port connector
When sending patterns from a computer to the
machine, plug the USB cable from the computer into
the USB Type “B” (function) port connector.
5 Power supply plug
Insert the plug on the power supply cord into the power
supply plug.
6 Main power switch
Use the main power switch to turn the machine ON (I)
and OFF (
{).
7 Ventilation slots
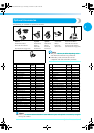
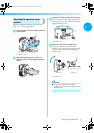
Operation panel
1 Start/stop button
Press the start/stop button to start or stop machine. The
lighting status and color of the button changes
depending on the operation condition of the machine.
Lit in red : When the machine cannot start
sewing
Flashing in green: When the machine can start
sewing
Lit in green : While the machine is sewing
Off : When the machine is turned off
2 Thread trimming button
Press the thread trimming button to trim both the upper
and the bobbin threads.
3 Automatic needle-threading button
Press the automatic needle threading button to thread
the needle.
4 LCD (touch panel)
Touch the keys that appear on the touch panel to select
and edit patterns and confirm various information.
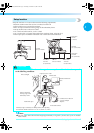
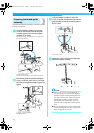
Bottom
4
1
2
3
Sapphire_brother.book Page 3 Thursday, November 17, 2005 2:44 PM