


34
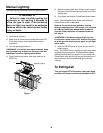
(b)
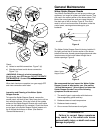
Figure 50
(c)
(d)
(e)
(f)
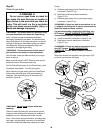
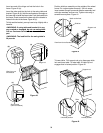
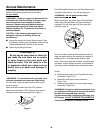
Step 33
Install glass doors
You will need: one LH glass door assembly and two RH
glass door assemblies.
Start with the LH door assembly. Insert the long hinge pin
at the top of the door into the plastic bushing in the
underside of the left frame. Insert the bottom (short) hinge
pin into the bushing in the frame connector. Repeat the
procedure with the RH door assemblies. The glass doors
latch on the frame connector. Figure 49.
Bushing in frame
connector and
short hinge pin
Figure 49
Bushing in
underside and
long hinge pin
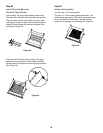
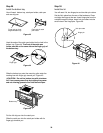
Step 34
Complete accessory installation
You will need: work table, serving tray, Warm-Up Basket,
warming rack, thermometer, two tubing plugs and a
hammer.
Insert one end of the Weber Warm-Up Basket into the
hole in the right end of the lid and the other end into the
slot in the left end of the lid. Figure 50 (a).
Set the work table onto the left side rails. Figure 50 (b).
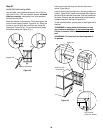
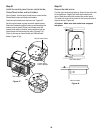
Place porcelain serving tray on the work table.
Figure 50 (c).
Set the warming rack into the slots at the rear of the
cooking box. Figure 50 (d).
Insert the thermometer into its holder. Figure 50 (e).
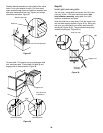
Insert tubing plugs into the ends of the frame. To fully seat
the plugs, you may have to tap them lightly with a
hammer. Figure 50 (f).
(a)