


24
The following alternate illustrated instructions will replace the
itemized instructions in the manual as follows: Items 11 through
14 on page 18 and Items 14 through 17 on pages 21 and 22.
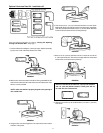
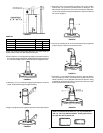
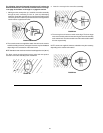
1. Making sure the arrow points “up”, install the vent collar assembly
through the wall, connecting it to the 6” (15.2 cm) telescoping
extension. Remember, the extension is not connected, and it may be
necessary to return indoors to push the extension back against the
interior wall for a tight fit to the collar.
FIGURE 100.
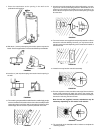
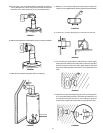
2. Three wood screws are supplied to attach the collar to the exterior
wall of the building. However, other types of screws may be substituted
depending on the construction of the exterior wall.
NOTE: alternate screws used must not have heads larger than 3/8” (.95 cm).
The three screws must be placed at every other hole 120° apart to
secure the vent collar assembly to the outside wall.
FIGURE 101.
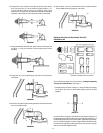
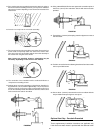
3. Insert the vent cap in the vent collar assembly.
FIGURE 102.
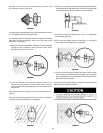
4. The vent cap has six holes around its outer edge. The three larger
ones are to fit over the three screws securing the vent collar assembly
to the exterior wall. The three smaller ones will now be used to attach
the vent cap assembly.
NOTE: screws are supplied. However, substitution may be necessary,
depending on the exterior wall material.
FIGURE 103.