


153
STACKING INCUBATORS
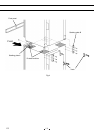
Use the following procedure to stack Incubators. This work is potentially dangerous, so contact a Sanyo
representative or agent.
1.㩷 Take out the stacking brackets (A and B), the protective stickers, and the four screws from the
accessory bag.
CAUTION
When stacking two Incubators, use two stacking brackets (A and B) for each one. Only one pair of
stacking brackets is provided per Incubator, so take out the brackets (A and B) from both Incubators.
2. Unplug both of the Incubators that are to be stacked.
3. Attach the protective stickers to the four corners on the top surface of the Incubator that is to be on the
bottom. (See Fig. A.)
4. Remove the caps at the two places in the front of the top surface of the Incubator that is to be on the
bottom, and secure stacking bracket A with the screws that are provided.
5. Remove the power supply panel (4 screws, wiring connectors in 3 places, ground wire, and gas pipe)
from the Incubator that is to be on the top.
6. Place the upper Incubator on top of the lower one, being careful not to pinch your fingers.
7. Make the lower Incubator level by adjusting the legs, and then level the upper Incubator in the same
way.
8. Secure stacking bracket A to the upper and lower Incubators with the accessory screws.
9. Remove from the back of the lower Incubator the two stabilizing brackets (4 screws) and remove from
the upper Incubator the 2 screws on the lower rear panel.
10. Use the 6 screws that were removed in step 9 to secure stacking bracket B to the rear panels of the
upper and lower Incubators.
11. Reconnect the power supply panel (4 screws, wiring connectors in 3 places, ground wire, and gas
pipe) to the upper Incubator.
12. Use the stabilizing bracket on the back of the upper Incubator to prevent the Incubators from falling
over.
CAUTION
x Select a floor that is strong enough to support the stacked Incubators.
x Never stack three or more Incubators. Doing so is dangerous.
62