


Regency
®
P40 Direct Vent Gas Fireplace
32
INSTALLATION
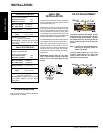
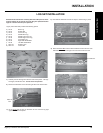
Diagram 1
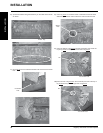
Diagram 3
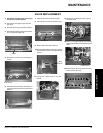
STANDARD
FLUSH DOOR
NOTE: Install Finishing Trim prior to installing
the Flush Door and Louvers.
1) The standard fl ush door comes with a black
frame. To install the frame, simply hook the
top door fl ange onto the top of the unit and
swing the door towards the unit, diagram
1.
Diagram 2
NOTE: Springs and chain must always
be OVER not under the gas line.
2) Be careful that the glass gasket does not
roll up; there must be a gap between the
gasket and the door lip to ensure that the
door sits securely on the unit. Diagram 2.
3) Use the hook to pull the spring out until you
can put the hook into the slot on the bottom
door bracket. Repeat for 2nd spring. See
diagram 3.
4) To remove the fl ush door, reverse the above
steps.
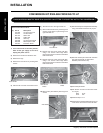
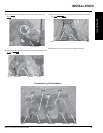
FLUSH LOUVERS
NOTE: Install Finishing Trim prior to installing
the Flush Door and Louvers.
INSTALLATION
1) Install the top louver by sliding the two bracket
clips into the brackets located underneath
the top of the fi rebox.
2) Install the bottom louver by securing the
louver onto the 2 hinges provided.
Note: Top and
Bottom Louvers
are different.
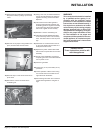
3) Installing the Manual Control Box
a) Ensure that the bottom louver is open.
b) Pull out the Manual Control Box from the
right side under the bottom of the fi rebox.
c) Using the 2 screws on the louver, secure
the control box onto the right side of the
louver.
Manual Control Box
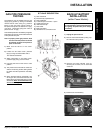
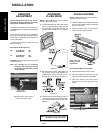
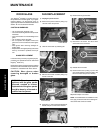
AERATION
ADJUSTMENT
The rear burner aeration is factory set but may
need adjusting due to either the local gas supply
or altitude.
The rear burner air shutter can be adjusted by
moving the air shutter wire. Open (pull) the air
shutter wire for a blue fl ame or close (push) for
a more yellow fl ame.
* The front burner aeration is factory set, do not
adjust this setting.
Minimum Air Shutter Opening:
NG Front Burner* 1/8"
Rear Burner 1/4"
LP Front Burner* 3/8"
Rear Burner 5/16"
CAUTION: Carbon will be produced if air shutter
is closed too much.
Note: Any damage due to carboning
resulting from improperly setting
the aeration controls is NOT covered
under warranty.
Aeration Adjustment should only be per-
formed by an authorized Regency
®
Installer
at the time of installation or service.
Adjustment Wire - Pull to open or
push to close aeration cap.
Rear Burner
Adjustment Wire