


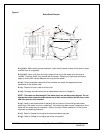

Chapter 9.0: Maintenance and Repair
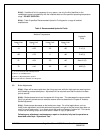
NEMA Standard ICS 9-1993, Part 1 recommends that brakes be fitted with new or re-lined shoes
before the lining material is worn excessively. Refer to Table 4 for minimum thickness.
9.1: Replacing the Brake Shoes
9.1.(a): Remove and reinstall the brake shoes as follows. Use a lifting devise as necessary.
9.1.(a).(i): On a hoist lower the load to the floor and disconnect the load from the bottom block.
9.1.(a).(ii): Reset the bottom block on the floor, or on a suitable support. Chock drum to prevent
rotation of the drum.
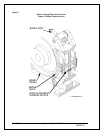
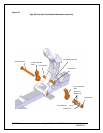
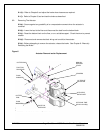
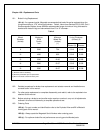
9.1.(a).(iii): Refer to Fig. 5.
9.1.(a).(iv): (1) Manually release the brake as instructed in Chapter 6.
9.1.(a).(v): (2) Remove cotter pin and withdraw the actuator drive end pivot pin.
9.1.(a).(vi): (3) Remove hitch pin at the active upper end of each link arm; withdraw the pivot
pins.
9.1.(a).(vii): (4) Lift the brake rod and lever assembly clear of the brake body.
9.1.(a).(viii): (5) Remove hitch pin at the fixed lower end of each link arm; withdraw the pivot
pins.
9.1.(a).(ix): (6) Lift out the link arm/brake shoe assemblies.
9.1.(a).(x): (7) Remove hitch pins and withdraw the shoe pivot pins.
9.1.(a).(xi): (8) Brake shoes can now be removed for service. To avoid loss, restrain the spring
loaded shoe alignment tension device when removing a shoe.
8/17/2006 Page 26 of 33 MST/E Electric Shoe Brakes Manual
560022-R6