


28
NOTE: DIAGRAMS & ILLUSTRATIONS ARE NOT TO SCALE.
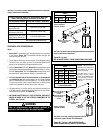
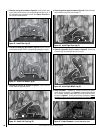
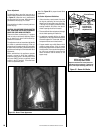
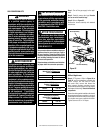
Figure 50 - Burner Flame Appearance
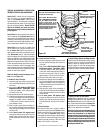
Burner Adjustment
To adjust the flame, move the lever arm up or
down (located in the lower control area as shown
in Figure 51). When the arm is positioned all
the way down it is fully open. When the arm is
positioned all the way up, it is closed.
Ensure that the air shutter is closed (push lever
all the way up).
CAUTION: DO NOT BEND THE AIR SHUTTER
ROD. MAKE SURE THE AIR SHUTTER MOVES
WHEN THE LEVER ARM IS OPERATED.
Observe the flame continuously. If it appears
weak or sooty as previously described, adjust
the air shutter up or down until the flame ap-
pearance is as desired.
The adjustment rod and associated adjustable
air shutter is patented technology. Flame ad
-
justments can be made quickly and accurately
to taste without the need of disassembling the
appliance and waiting for 30 minutes after each
adjustment.
When satisfied that the appliance operates
properly, proceed to finish the installation.
Leave the control knob in the ON position and
the burner ON/OFF switch (or optional remote
switch) in the OFF position. Close the lower
control compartment panel.
Note: See Figure 50 for proper burner flame
appearance.
Air Shutter Adjustment Guidelines
• If there is smoke or soot present, first check
the log set positioning to ensure that the
flames are not impinging on any of the logs.
If the log set is properly positioned and a
sooting condition still exists, then the air
shutter opening should be increased.
• The more offsets in the vent system, the larger
the air shutter opening will need to be.
• An appliance operated with the air shutter
opened too far, may have flames that appear
blue and transparent. These weak, blue and
transparent flames are termed anemic.
• Propane models may exhibit flames which
candle or appear stringy. If this is present
and persists, adjust the air shutter to a more
closed position, then operate the appliance
for a few more minutes to ensure that the
flame normalizes and the flames do not
appear sooty.
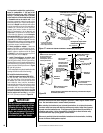
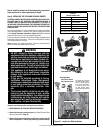
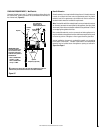
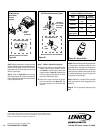
Figure 51 - Burner Air Shutter
Adjustment
All the way up = CLOSED
All the way down = OPEN
Adjust the rod to the full closed position for
both Natural Gas and Propane. Light the fire-
place, then adjust accordingly after heat-up.
Valve
Front of Burner
Air Shutter
Adjustment
Rod
Reach around the
left side of the
valve to locate
adjustment rod
(JG) Darken the shading in Fig