


23
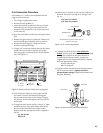
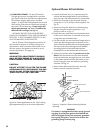
Connect the Wiring Harness
1. Locate the switch bracket on the back of the
stove, below the burner control switch.
2. Remove the four 1/4” hex head screws that
secure the switch bracket to the left rear
shroud. Carefully pull the switch bracket away
from the stove.
3. Use pliers to remove the blank switch cover from
the bracket.
4. Insert the new HI/OFF/LO blower switch into the
bracket. Feed the wires up from the blower
within the left rear shroud of the unit.
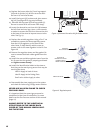
5. Connect the insulated wires (from the blower) to
the three leads on the HI/OFF/LO switch. BLACK
wire to the HI position, WHITE wire to the OFF
position, and the RED wire to the LO position.
6. Reattach the switch bracket to the rear shroud.
NOTE:
THE BLOWER WILL ONLY OPERATE WHEN
THE SWITCH IS IN THE HI OR LOW POSI-
TION AND ONLY WHEN THE SENSOR
(SNAPSTAT) HAS BEEN HEATED BY THE
STOVE AFTER THE BURNER HAS BEEN
OPERATING APPROXIMATELY 10-20 MIN-
UTES.
Operation
Familiarize yourself with the controls of the GF600
Firelight. Make sure that anyone else using the
appliance is also familiar with the controls and
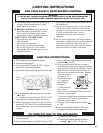
operation procedures. Always follow the Lighting
Instructions on the inside back cover of this manual
and also located on the Rating Plate attached to the
burner assembly.
1. Once the pilot is lit, burner operation is controlled
by the rocker switch located at the left rear
corner of the stove. Use the T-STAT position for
the optional thermostatic or remote control
functions.
2. During the first few fires, you may notice odor
and/or smoke from the stove. This is normal and
results from burn-off of manufacturing residue
and curing of materials. You may find it helpful to
provide additional ventilation and fresh air to
alleviate this condition.
3. Condensation may develop on the glass when the
burner is first lit. This “fog” will disappear as the
heater warms up.
4. Keep the controls and the area under the appli-
ance free of debris, vacuum this area frequently.
Always keep the appliance area clear and free
from combustible materials, gasoline and other
flammable liquids.
If a vacuum is used during any service on the
stove, ALWAYS be sure the stove is cold.
5. This appliance has a continuous burning pilot
flame. Exercise caution when using products
having combustible vapors. Always shut-off gas
supply while servicing the stove.
6. CAUTION: DO NOT OPERATE THIS APPLIANCE
WITH THE GLASS REMOVED CRACKED OR BRO-
KEN. Replacement of the glass should be done by
a licensed or qualified service person. Use only
replacement glass provided by your authorized
Jøtul dealer. Never use any substitute materials.
WARNING: OBSERVE CAUTION WITH THE GLASS.
THE GLASS PANEL MAY SHATTER UNEXPECTEDLY
IF STRUCK WITH AN OBJECT. ALWAYS HANDLE
THE GLASS PANEL WITH CARE. WHEN SERVICING
THE STOVE ALWAYS PULL THE GLASS ASSEMBLY
STRAIGHT UP FOR REMOVAL.
7. Clean the glass only when necessary. Wipe
surface with a clean, damp soft cloth. Follow with
a dry, soft towel as desired. Take care not to
scratch the glass surface.
WARNING: DO NOT USE ABRASIVE CLEANERS ON THE
GLASS. NEVER CLEAN THE GLASS WHEN IT IS HOT.
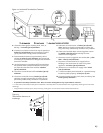
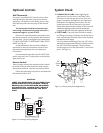
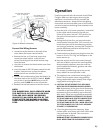
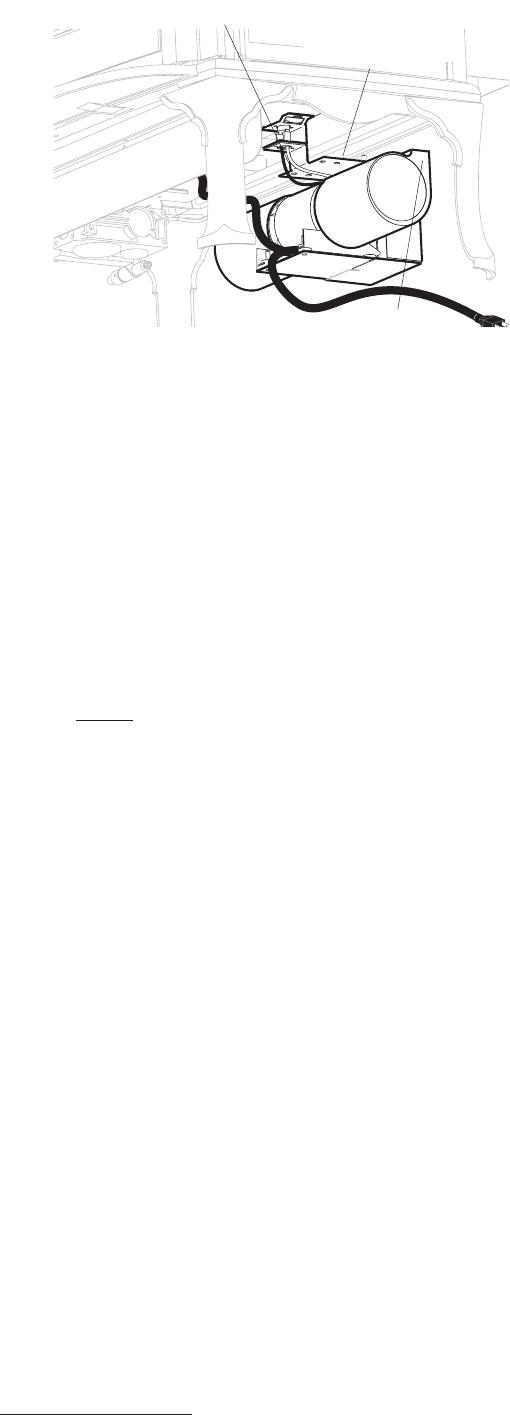
Use middle holes to
mount bracket to
stove bottom
Figure 26. Blower orientation.
Front of stove
Fan Ducts faces
to rear
Connect Black and White
wires to Snapstat