


39
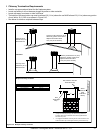
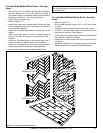
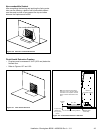
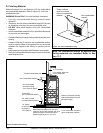
Figure 11.2 Herringbone Molded Brick Panel
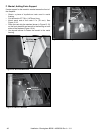
Note: UseT-bracketsastemplatesanddrillpilotholesinto
theinnershellwiththedrillbitprovided.Sidepanelsmust
beinstalledrst.
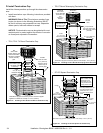
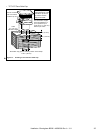
E. Install Back Molded Brick Panel - Herring-
bone
• RefertoFigure11.2.
• Setthegratebracketsinplace,26.5in.(673mm)center
to center.
• Installthelowerbackpanel.Centerfromsidetoside.
• InstalltwoT-bracketsstemdownintomortarlinetohold
lowerbackinposition.Donottighten.
• Installupperbackpanel.Positionbottomofpanelbehind
thepreviouslyinstalledT-brackets.
• InstallthreeT-bracketsstemsideupintomortarline,do
nottighten
• InstalltwoZ-bracketsinthemortarlinesacrossthetop.
Tightentheseandallpreviouslyinstalledbrackets.
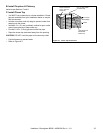
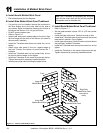
D. Install Side Molded Brick Panel - Herring-
bone
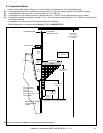
• Ifagaslineistobeinstalled,removetheknockoutsin
the inner rebox and inthe outer shell on theside of
yourchoice.Refertodimensiondrawingsforlocationof
knockoutsandSection13.A.forgasprovisions.
• DoNOTremovescreenrods.
• RefertoFigure11.2.
• Installlowersidepanel,taperededgetothefront.Align
thefrontedgewiththefrontofthecolumn(orbuttedto
thesurroundifinstalled).
• InstalltwoT-bracketsstemdownintomortarline,donot
tighten.
• Install upperside panelin the unit, tapered edge to
thefront. Positionthebottom ofpanel behindtheT-
brackets.
• InstalltwoT-bracketsstemupintomortarlines,oneY-
bracketonthefrontedgeasshown.Donottighten.
• InstalltwoZ-bracketsinthemortarlinesacrossthetop.
Tightentheseandallpreviouslyinstalledbrackets.
• Installsecondsidepanelfollowingthestepsabove.
Hearth Molded Brick Panel
Lower Side
Molded Brick Panel
Upper Side
Molded Brick Panel
Front
Lower Back
Molded Brick Panel
Grate Brackets
Upper Back
Molded Brick Panel
Heatilator•BirminghamBIR42•4059-308RevJ•1/11