


7
920-198-01
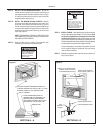
Figure 7
Care and Maintenance / Fresh air and exhaust control
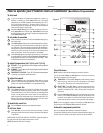
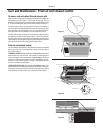
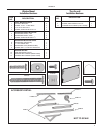
To remove, wash and replace filter and return air grille
Open the return air (RA) grille by grasping it at the top outside edges and
pulling towards you (See Figure 7). The RA grille will stay open until it is
detachedorclosed(itiseasiertocompletelydetachthegrillebeforeclosing
it). To remove the RA grille, grasp it at the bottom and pull towards you.
The ¿lterisheldinplacebytwospringclips(SeeFigure
7).Pushdownon
theclips,graspthe¿lterandpulltowardsyouto removeitfor cleaning.Clean
with warm water and a mild detergent, rinse, dry completely and replace.
Use caution when removing the ¿lter. The coil surface can be sharp.
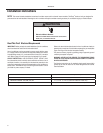
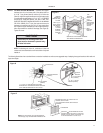
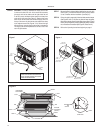
If the RA grille has been removed, pick up the grille by supporting it from
both sides near the bottom (See Figure 8, Note 1). Lift return air grille and
insertthe grille's tabsintothe bottomslots of the dischargeairplenum (See
F
igure8,Note2).Snapthegrilleintoplacebypushingthegrilleupandonto
the unit's latches at the bottom (See Figure 8, Notes 3 and 4).
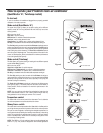
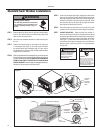
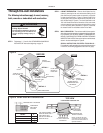
Fresh air and exhaust control
tsuah xeromoorehtotniriahserfgnirbotytilibaehtsahre noit id nocriaruoY
fotrapreppuehtnodnuofsirev ellort nocehT.moorehtfotuoriaelats
.)9eru giFeeS(tinueht
TOBRINGINFRESHAIR-Move the lever tothe FreshAirposition which
allows outs
ide air to enter the room. This is useful in fall and spring as a
means of bringing in fresh outside airwhen using Fan Only.Itcanalsobe
.hsiwuoyfiedoMgni looCehtniros serp mocehthtiwremmu
sehtnidesu
sihthtiwdehsilp moc casignilooc,noitarepotneic¿fetsomrof,yllamroN
control in the middle or closed position.
TOEXHAUSTINDOORAIR-Move the lever totheExhaustposition.This
- ep sesisihT.gnillewdehtfoedistuoehtotdellepxe
ebotriaelatswollalliw
aretfaro,elatstegotsdnetriaroodninehwllafrognirpsehtniydn
ahyl laic
.gnikoocretfasrodoevom erotro,srekomsgnivlovnignirehtaglaicos
DISCHARGEAIR PLENUM
SLOT
TA B
SLOT
TA B
NOTE 2
RETURNAIR GRILLE
NOTE 1
LATCHES
NOTE 3
NOTE 1
RETURNAIR GRILLE
NOTE 4
SIDE VIEW
LATCH
NOTE 3
Figure 8
Figure 9