


30
MR810 Technical Manual Rev C REF 185042601
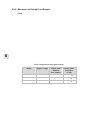
6
6.8 ASSEMBLING THE PCB AND CASE
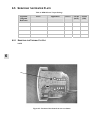
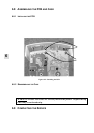
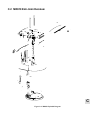
6.8.1 INSTALLING THE PCB
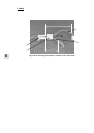
1. Ensure the LED light pipe is located correctly in the holes in the top and front of the case top.
2. Carefully angle the front of the PCB over the LED light pipe, inserting the push button stems into the
silicone push buttons, ensure the light pipe stems protrude into the holes on the PCB (Figure 6.12).
3. Carefully guide the cable clamp into the slot in the case top.
4. Check that no wires are trapped between the transformer mount and upper case.
5. Install the two screws through the PCB assembly into the case top and screw down (torque settings as
per Table 6); check the push button operation.
Figure 6.12: Installing the PCB
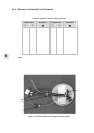
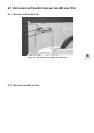
6.8.2 REASSEMBLING THE CASE
1. Angle the back of the case bottom into the case top (Figure 6.1).
2. Drop the front into position, ensuring the screw hole and drain are correctly located. Then press the
front down and the case top should snap into place.
3. Screw the three screws into place to secure the case lower (torque settings as per Table 6, § 6.5).
WARNING: Ensure case screws are correctly fitted to the product. Replace the top
case if any screw threads strip.
6.9 COMPLETING THE SERVICE
1. Power up the device and check that the push buttons and indicators work correctly.
2. Complete the appropriate electrical safety tests outlined in § 7.
3. Perform the performance tests outlined in § 8.
LED light pipe
stems
Light pipe
PCB locator
holes