


28
MR810 Technical Manual Rev C REF 185042601
6
Caution
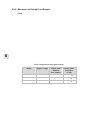
When connecting the power cable ensure the polarity of the wires is correct (the table given above
applies to power cords supplied by Fisher & Paykel Healthcare). If other cables are used ensure
that they are fitted with ferrules to prevent loose wire strands.
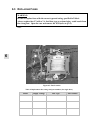
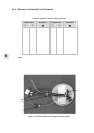
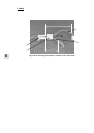
Figure 6.10: Showing the disassembly, assembly of the cable clamp
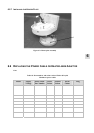
1. Open the case and remove the PCB (§ 6.2).
2. Cut the cable tie retaining the phase and neutral conductors to the PCB (see Figure 6.4 for PCB
connection locations).
3. Unscrew the power cable conductors from their terminal blocks.
4. Unplug the heater-wire adaptor harness from the PCB.
5. Slide the cable assembly off the transformer support.
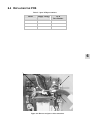
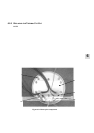
6. With a large flat-blade screwdriver, carefully lever off the cable collet from the cable clamp. (Figure
14 shows separated cable clamp parts).
7. Replace the power cable (refer to Table 10) or heater-wire adaptor (part number 043 042 322) as
required.
8. Leave approximately 102 mm of the heater-wire insulation protruding from the closed cable clamp, and
37 mm of the power cord insulation (Figure 6.10).
9. Carefully slide the cable collet back over the power cable and forcefully press the cable collet back
onto the clamp.
10. Terminate the power cable to the correct locations on the PCB. (Refer to Table 10 for colour codes,
and Figure 6.4 for PCB connection locations).
11. Anchor the phase and neutral conductors to the PCB with a small cable tie (2.5 mm wide).
12. Slide the cable assembly back onto the transformer support; ensure cables are not under excessive
tension.
13. Install the PCB and close the case (refer to § 6.8).
14. Check the power cable is held securely by pulling on it firmly.
Cable clamp
Cable collet
Heater wire
insulation
Power cord
insulation
37 mm
102 mm