


37
WinterWarm Fireplace Insert or System
2000941
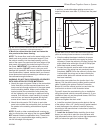
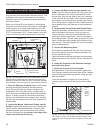
12. Move the Entire Unit the final few inches into
the Cabinet.
Move the WinterWarm the final few inches into the
cabinet, making sure the surround panels are properly
aligned. If you are using the CFM Corporation Flex
Connector System, reach up into the flue collar area
to grasp the Starter Piece and pull it down into the flue
collar. Bend the retaining tabs 90° against the bottom of
the flue collar.
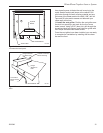
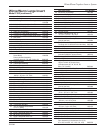
13. Install the Latticework Panels.
The two panels are not interchangeable. Each is la-
beled with a designating letter cast into the iron next to
the tab — “L” for left and “R” for right. The corner cut-
outs must be positioned on the back edge. The panels
are anchored at the bottom by a single tab that is
bolted on. (Fig. 59) At the top, the panels are retained
by the overhang of the mantel.
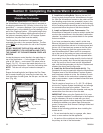
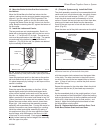
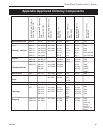
15. (Fireplace Systems only) Install the Plinth.
The plinth assembly consists of a pre-assembled plinth
center and front, two plinth end caps, two plinth connec-
tors, and six hex head screws (1/4-20 x 1/2” (13mm).
Invert the plinth center and front assembly on a flat
surface. Unpack the two end caps and invert them also,
placing one at each end. Make sure the decorative
fronts of the end caps are in line with the front of the
plinth. (Fig. 60)
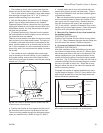
Place the stem end of the plinth connector on the plinth
Lower the panel and seat it on the base so the anchor
tab locks behind the rib cast in the base plate. Secure
it in place temporarily by holding it or with tape until the
mantel is installed.
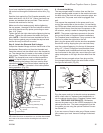
14. Install the Mantel.
Place the mantel flat side down on the floor. Lift the
mantel slightly and slip the drilled and tapped ends
of the column capitals under each end of the mantel.
Align the two tapped holes in each capital with the two
holes in each end of the mantel, and thread in two 3/4”
(19mm) hex head cap screws and two washers. Do not
tighten these cap screws with a wrench; leave them
finger tight. Use care during this assembly process,
especially with enamelled parts. Forcing the mantel or
capitals into position may cause chipping or cracking.
Install the mantel and capital assembly by raising it
into position and tilting it to the rear against the upper
shroud flange, with the flange on the shroud in front
of the back rib on the mantel. Push against the flange
slightly before lowering the front edge of the assembly
onto the upper trim piece.
with the connector hole centered over the tapped hole
in the plinth. The other two holes in the plinth connec-
tor should line up with the two tapped holes in the end
caps. (If they do not line up, remove the plinth connec-
tor and flip it over.)
Repeat this process for the other side. Attach the plinth
connectors with the six (6) hex head cap screws pro-
vided.
Set the assembled plinth in the upright position, in front
of and centered on the WinterWarm. Adjust the levelling
bolts on the bottom front of the fire chamber so that the
plinth will fit, slide the plinth into its final position, and
center it. Adjust the levelling bolts downward to lower
the WinterWarm onto the plinth.
Step 16. Replace the Ashpan and Ash Door, Front
Grate Bars, Bottom Grate and Load Door.
FP1136
Bottom anchors
7/01
Latticework
Panel
Corner Cut-out
Bolted-on Tab
FP1136
Fig. 59 A single tab at the bottom anchors the latticework
panel, while the top of the panel is held in place by the mantel
overhang.
FP1576
plinth
4/05
Preassembled
Plinth Center/
Front
Plinth End
Cap
Hex
Head
Screws
FP1137
Fig. 60 Before attaching the end caps, make sure their
decorative fronts line up with the front of the plinth.
Preassembled
Plinth Center/
Rear
Plinth Connector