


10
WinterWarm Fireplace Insert or System
2000941
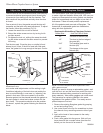
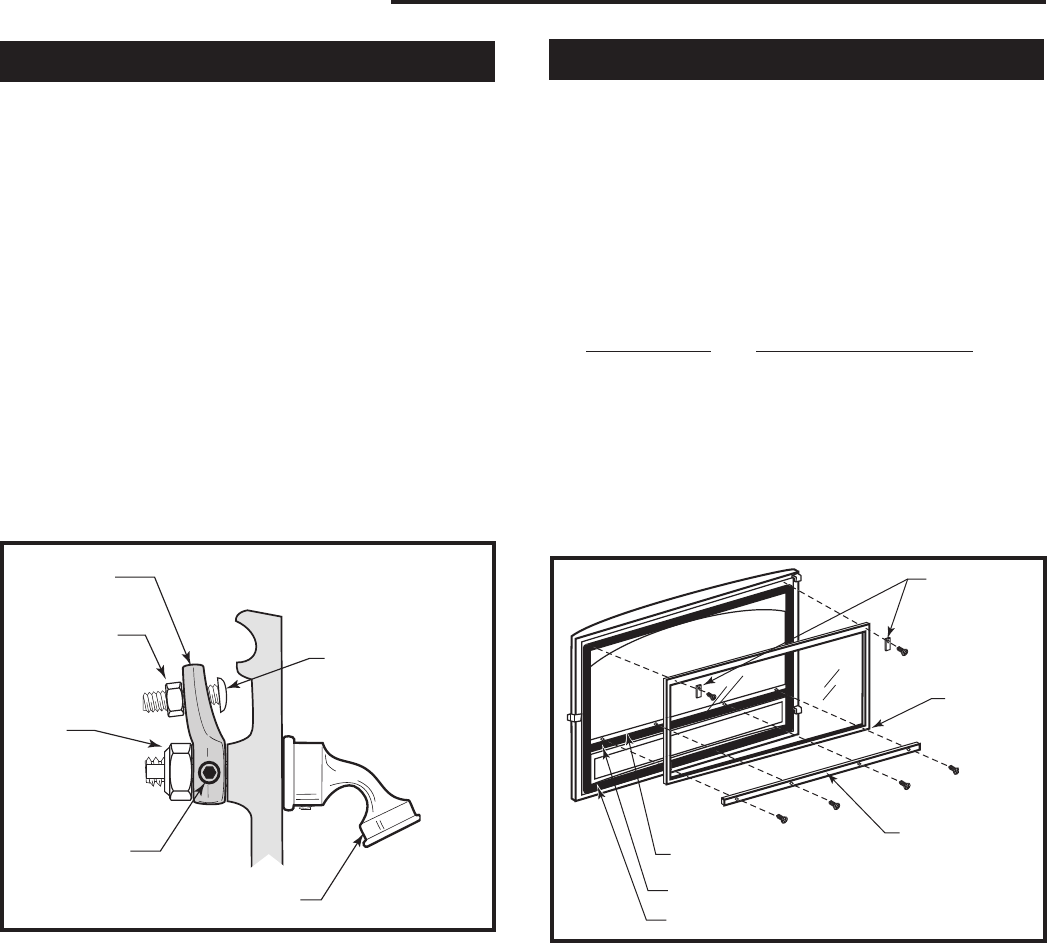
Adjust the Door Latch Periodically
The front door of the WinterWarm should close securely
to prevent accidental opening and should close tightly
to prevent air from leaking into the fire chamber. The
door handle will be positioned vertically when the door
is closed.
Over a period of time, the gasket around the door will
compress and the latch may need adjustment. To adjust
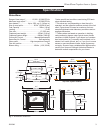
the handle, follow this procedure (Fig. 8):
1. Loosen the small lock nut with a wrench.
2. Extend the striker screw one turn by turning it with
an Allen wrench.
3. Re-tighten the lock nut, while at the same time hold
-
ing the striker screw with the Allen wrench to prevent
its turning.
Test the door seal. Close the door on a dollar bill and
attempt to pull it free. If the bill is freed with little resis-
tance, the gasket isn’t snug enough at that spot. Contin-
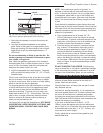
ST531
Door Pawl
11/00
Small
Locking Nut
Large
Locking
Nut
Pawl
Striker Screw
Set Screw
Handle Stub
ST531
Fig. 8 An adjustable latch lets you restore a tight seal to the
WinterWarm’s door.
ue to make small adjustments until the setting is right.
If additional adjusting of the latch does not enable the
door to seal sufficiently in one area, try “adjusting” the
gasket in that area. Pack more cement or a smaller
diameter gasket into the channel beneath the gasket so
the main gasket is raised and makes contact with the
door frame. This procedure should solve the problem.
If it doesn’t, replace the gasket following the directions
below.
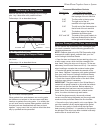
How to Replace Gaskets
Your WinterWarm uses rope-type fiberglass gaskets
to make a tight seal between some parts. With use, par-
ticularly on those parts that move, gaskets can become
brittle and compressed and can begin to lose their ef-
fectiveness. These will need periodic replacement.
All of the gaskets used are made of fiberglass. The
three sizes of replaceable gasket are listed below,
along with their application.
Replaceable WinterWarm Fiberglass Gaskets
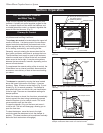
Gasket Size... ...And The Parts It Seals
1/2” The door to the front (#1)
1/2” The door to the front edge of
the grate (#2)
3/16” The cassette glass seal to
the door (#3)
3/8” The damper to the upper
fireback (#4)
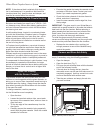
FP1076
WinterWarm
door parts
3/28/01 djt
Short Re-
tainer Clips
Welded
Corner
Toward
Firebox
Long Retainer
Clips
#3 Gasket
#2 Gasket
#1 Gasket
FP1076
Fig. 9 Front door components allow replacement of the
glass, gaskets or both.
Should you need to change a replaceable gasket, wait
until the fire is out and the stove has cooled. Be sure to
follow the standard safety procedure for working with
dusty materials: Wear safety goggles and a dust mask.
The procedure for replacing gaskets is the same,
regardless of the gasket location. Four easily-accom-
plished steps are involved:
1. Remove the existing fiberglass gasket by grasping
an end and pulling firmly.
2. Use a wire brush or the tip of a screwdriver to clean
the channel of any remaining cement or bits of gas-
ket.
3. Apply a thin bead of stove cement to the newly-
cleaned groove.
4. Pack a new gasket into the groove. Wait until you
have placed all but a couple inches from the end
before you trim the end to an exact fit.